Category Archives: Photos

Whoot for Summer

Summer vacation is finally here. As usual, with a large family we’re mostly planning on staying at the cottage or taking small day trips. That’s ok though as I have lots planned and we’ll definitely be enjoying the journey. I think beach days, splash pad visits, picnics, tubing, bonfires and bbq’s, sleeping in, lazy days, kids’ crafts, bike rides, camping in the backyard, building sand castles, play dates, sleepovers and water balloon fights sounds like a lot of fun.Whew!

I don’t often have time for too many challenges but I always find creating for fun recharges the creative “batteries”. This card was created for the Moxie Fab World I Want to Ride My Bicycle Challenge.  Fun challenge! I’m not quite sure whether this card is Moxie Fab or not but as with all creative challenges, it’s having fun that counts! I just squeaked in under the wire on this one but I’m so glad I managed it today. I had so much fun I can’t wait until the next challenge!

Looking for the Zva Creative Blog hop? Keep scrolling! It’s just below this post. 🙂

Enjoy the Journey

enjoy-the-journey-bicycle-c.jpg

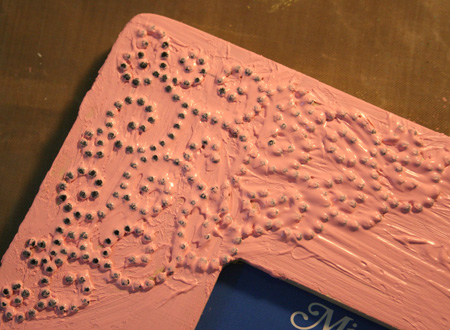
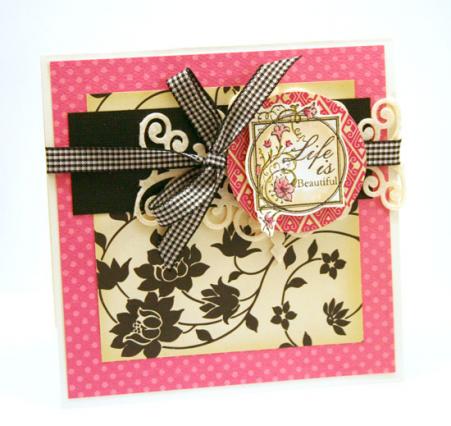
This darling chipboard bicycle is from the Dear Lizzy collection by American Crafts. I’ve paired it up with some fun prints from Lily Bee Design. Does this design drive you dotty? 🙂 Lots of dots and circle elements to have fun with.

The embellishments are pretty simple because of all the fun prints. Do you recognize the Zva Creative felt flowers? I’ve stitched them into little blossoms and placed them into the bicycle basket. I think I need to dust off my bike, check the tires and go for a spin. What do you think? Would a basket full of flowers to match this card be overkill?

Supplies: patterned paper and rub-ons by Lily Bee Design, twine, Tiny Attacher by Advantus, felt flowers by Zva Creative, pinking shears,  Brushed Corduroy Distress Ink by Ranger, Dear Lizzy chipboard by American Crafts

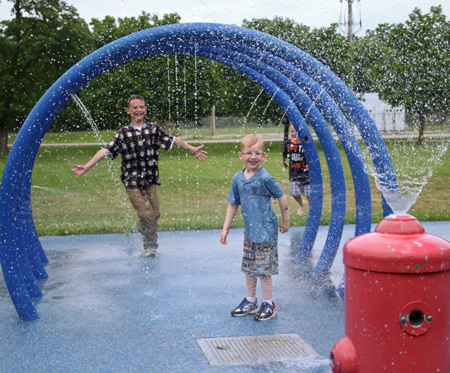
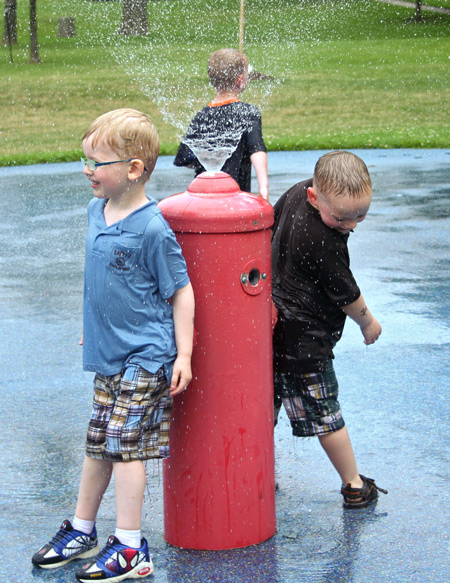
Need a little cooling down?

I thought it would be fun to share a few photos from a 50th wedding anniversary/family reunion on the weekend. A couple of my boys and their cousins managed to get into the splash pad fully clothed WITH shoes BEFORE family pictures.  They had a blast! lol I’m wondering what the official photos look like though!


water-hydrant-pop.jpg

water-rascals.jpg

So. What do you have planned for your summer?

Hope it’s a blast!

This & That

I’ve been super busy creating things I can’t quite share yet. Funny how things go in waves. I had a ton of things to share at the beginning of the month and am now scrambling to create something for the blog. I did find this one card left in my “to share” folder.

Do you love on-line shopping? I did a little yesterday as the new Basic Grey Oliver and Olivia lines are in at Ellen Hutson LLC.  I just couldn’t resist as they are so cute! Can’t wait for my mail to arrive!

thanks-so-much.jpg

This card uses some fun October Afternoon paper with rub-ons, stitching and some inked canvas. I sponged the outside and die cut edges of the canvas with ink to add color and highlight them.

Quick Tip: when die-cutting, use the positive and negative shapes on your project for a fun look.

Supplies: patterned paper by October Afternoon, Printed Canvas by Prima Marketing, rub-on transfer, sewing machine, butterfly by Jenni Bowlin, Circle Nestability Die and  Nested Dahlia Die by Spellbinders, Dried Marigold Distress Ink and Shabby Shutters Distress Ink by Ranger

I spent yesterday relaxing and then cleaning my space. The top photo was taken June 11th and the bottom one after a whirlwind creative marathon. I really hadn’t planned to share but Susan Opel posted this on Facebook yesterday on the Paper Crafts page so I thought I might as well. lol There’s nothing quite like having that photo shared to get it done. After a day of procrastination, it DID spur me into action. 26 minutes and 57 seconds later ( I used a timer), everything was put away, the counters dusted and the floor swept. It now looks like the first photo again. When I designed the room, I really took into consideration how I create and how I would store everything. Everything has a place and is easy access so it makes clean up a lot easier.  Yay! I’m ready to get right to work in my space this morning.

craft-room-whirlwind.jpg

So. Which does your space look like. Number 1, number 2 or somewhere in between? 🙂

Have a creative day!


Embedded Rhinestone Frame…a tutorial

A few weeks ago, I was in a brain-storming kind of mood and came up with a fun new technique using two of my favorite products…Zva Creative Crystals and Distress Crackle Paint by Ranger. I had my fingers crossed that it would work and I’m so excited with the results.

Today I’m also challenging you to create with some paint for the Ways to Use it Challenge. I hope you’ll play along with us here.

The Embedded Rhinestones technique gives your project almost a mosaic type feel. The rhinestones become embedded in the paint and instead of sitting on top of the project, become part of it. I love how this technique covers up the adhesive lines and adds an interesting textured look.

distressed-rhinestone-frame.jpg

To start your project, first adhere your Zva crystals to the wood base of the frame. This technique can also be done on very heavy cardstock or chipboard or any surface that will take the Distress Crackle Paint well.

distress-paint-on-gems.jpg

After applying the crystals, brush over the entire area with Ranger Distress Crackle Paint. For this project I’ve used the Worn Lipstick shade as it is one of my favorites. Make sure the area is covered well. You can use the brush in the lid of the crackle paint and I’ve also used a Studio line brush to work it into smaller areas.

Using tissues or paper towel, wipe off the paint from the surface of the crystals. You will need to do this a few times to clean it off well. Do not remove the paint from between the rhinestones.

drying-distress-frame.jpg

Your project should look something like this. As you allow it to dry naturally, cracks will form and give you a beautiful distressed surface.

To finish up my project, I sponged the edges with Frayed Burlap Distress Ink to highlight some of the cracking. The Vintage Text Scrapblock was randomly stamped over the surface with Pumice Stone Distress Ink.

I wanted to create a fun die cut flower embellishment to accent the final design. Here I’ve used the Tim Holtz Tattered Florals die by Sizzix and die cut some sweet Jenni Bowlin Homespun papers and a vintage dictionary page. The center is a felt Zva Creative flower and a Zva Creative Crystal.

Happy creating!

a gift bag and my travels

The other day I thought it would be fun to decorate a gift bag. I’ve done this a few times in the past but it was a long, long time ago. Decorating a gift bag is super easy to do, it was fun to personalize it and this project also used up some scraps I had on my desk.

This project uses the On Holiday line from The Girls’ Paperie. Love the colors combo, the banners and the fun travel theme.

paperie-gift-bag.jpg

What might not be apparent in the above picture is a couple fun little details I added to the project. Because this gift bag was for an American friend, I thought it would be fun to cut out some of the Canadian postage stamps, ink them and then pop them up on pop dots. Just to highlight where the gift was from. 🙂

paperie-bag-detail.jpg

Quick Tip: Stitch the layers before adhering them to your gift bag otherwise you won’t be able to.

And I hope you don’t mind my sharing a few photos from the Creating Keepsakes Convention in Buffalo. As I rarely get anywhere it was huge for me and I had the best time meeting friends I’d made on-line

becky-megan-and-i.jpg

Becky Olsen, Megan Hoeppner and I. I had so much fun meeting and hanging out with these uber-talented and sweet ladies.

susan-opel.jpg

I was excited to help out the fabulous Susan Opel with the Paper Crafts magazine Make ‘n Take

melissa-frances-at-make-n-t.jpg

Melissa Frances was there with a booth and I was excited to meet this talented & lovely lady.

beautiful-historic-architec.jpg

So much stunning architecture to see in Buffalo

Thanks for letting me share!

Have a beautiful day!

Good Things Come

Good things come… to those who wait. And wait. And wait. But I’m so excited that my waiting is ALMOST over! Here’s a photo of things in progress on Saturday. I’m hoping by the beginning of December, I’ll be all moved in. What a great present this year!

under-construction.jpg

And just in case you haven’t heard…

anniversary-blinkie.gif

Ellen is having a fabulous Anniversary Sale! Be sure to check out the store here for more details.

As for me…no headache this week but I do have the nastiest cold. I now have no voice whatsoever. I’m hoping to get back to creating soon!

Take care and stay healthy!

Excuse Me While I Charge My Batteries

Yes…you are on the right blog! Grin. Major facelift here. I just wish I looked so good! If you’re reading this on google reader or other feed, please come visit. I have a beautiful new blog template. Sara Williams rocks! She worked so hard to get it ready in time for World Card Making Day…October 3rd. Unfortunately some server issues made us wait until now but I’m just thrilled that it is working! No more grey!

Sara from Tweaks and Designs has just done an incredible job. She worked so hard to make the template “me”. The colors, the images, the feel is just so perfect. I love beautiful things and this new blog template is inspiring me to get creative. I need a bit of that right now!

The other thing that may have you wondering if you’re on the right blog is the photos. No paper crafts today. Over the past few weeks I’ve felt a need to do some fall nesting and just recharge my creative batteries by doing so home-related projects.  Here’s a little peek at some of the things I’ve been working on…

before-pot.jpg

pies.jpg

dresser-front.jpg

Another thing I’ve been working on is a new blog. I know. I think I’m a little crazy to be starting that as well but I really wanted to be able to go a different creative direction now and then and didn’t want to bore you here if it’s not your thing. It’s called finding beauty @ home and it’s a whole melting pot of things. Creative home projects, recipes, ramblings on being a stay at home mom, a few inspirational thoughts and whatever else I may think of! LOL If that’s something you’re interested in, stop by and say hello. And if not… Don’t worry! I’ll still be paper crafting and posting here. I just need to find the right balance in my life.

Quick Tip: If you need to charge your creative batteries, switch creative gears for a project or two. You’ll be glad you did!

Thanks for your support!

A New Addition…

We have a new addition here at the Stainton household. We thought five kids were enough so don’t worry…not another one of those. We have a new puppy.  We lost our 13yo German Shepherd in June and we wanted another so Friday night we got a new puppy. So much for my stress-free weekend! 😉 Seriously…I think a new puppy is more work than a new baby. At least human babies stay where you put them and will wear a diaper! It’s been a long time since we had those 13 puppies born Christmas Day. Fourteen years to be precise and at that time we had their mom to help look after them. I knew it was going to be busy but by Saturday morning I was thinking, what HAVE I done?! Actually he’s really starting to settle in already and is such a smart little guy. He really is little as he’s not quite 7 weeks old. After MUCH debate, we named him Maximus. The kids are loving him and it’s been great for getting them outdoors more.

jks-max.jpg

Here he is with my 6yo. That should give you a little idea of the size. I’ll get some better pics to share soon. He’s just been a busy little guy and hard to catch a photo of!

***** It’s time for summer CHA again and I’m once again staying home. That’s a good thing with the new puppy! It’s been fun seeing the new sneak peeks so far and what I’m really looking forward to is keeping an eye on what’s going on with Craft Critique. Many of the reporters are off to check it out and they always provide great coverage. Keep your eye on Craft Critique as there will be updates there throughout the day once the fun begins!

Life is Beautiful

jks-life-is-beautiful.jpg

Here’s a quick card I put together. I’m loving this dotted Bazzil cardstock…so pretty and I still love those Jenni Bowlin 4×4 mini papers. I bought some more that arrived while I was on vacation and I can’t wait to get into them!

Stamps: Ornamental Beauty (The Rummage Bin line) by CHF

Ink: Black Memento by Tsukineko

Paper: cardstock by Bazzill Basics, 4×4 paper by Jenni Bowlin, Simply Smooth white cardstock by Cornish Heritage Farms

Other: voila trim by Prima, ribbon, circle punch, Copic markers

Have a beautiful day!

a-signature-2.jpg