Daily Archives: October 10, 2011

punch it up

I love my punches. Especially my border punches. While die cutting has some fabulous options, I think there is a place for the quick and easy punch in every craft room. I don’t have to worry about anything, just a quick punch and it’s done.

My favorite border punches are the simple ones. The ones that are timeless and can be used on so many different designs. I’ve punched cardstock and patterned paper with them and just finally got around to trying punching vellum borders. I love the subtle lacy look.

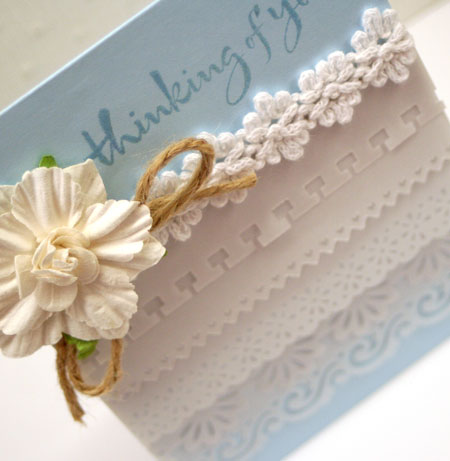
To create this card, I’ve punched a series of layers of vellum with different edger punches. At the bottom you get see the blue cardstock showing through and as you go up, the layers of vellum become more opaque.

Because vellum is translucent, you need to take care where you adhere it. I’ve made each layer longer than the first so that they would all adhere from the same place. They all adhere with strips adhesive and I then covered it up with the lace trim.

If you’re looking to round out your punch collection, Ellen Hutson LLC has a punch clearout. Most punches are 40% off. I’ve had my eye on a few and now is a great time!


So today has been a great day. My family at home and lots of turkey and pie. I have so much to be thankful for. I’m sad though too, as I just said good-bye to my daughter. I’m thankful she’ll be home in two weeks. I hate good-byes.
Take care and happy creating!

bountiful blessings

Happy Thanksgiving!

It’s Canadian Thanksgiving today and I’m so excited to be spending the day with my family, cooking pie and turkey and just enjoying all my blessings. I hope today is a day of blessing for you to, even if it’s not Thanksgiving where you are. Every day is a good day to count your blessings.

This card uses the Autumn Greetings Market Street Stamps set and be working a little masking magic, I’ve turned the sweet pumpkin into a lovely festive container for the fall flower bouquet.

Eclipse Tape is my favorite product for masking. It really can’t be beat for precision. To mask this little arrangement I first stamped the flowers and only inked up the blossoms and not the stems. After stamping the flowers, I restamped them onto the masking tape and carefully cut out the image. The more care you take in precision cutting, the better and cleaner your masking will appear. Cover up the flower image with the cut out masking tape and then stamp the pumpkin. I’ve then colored the image with my Copic Markers to finish it off.

Here’s the Copic Marker colors that I used.

Supplies:


Wishing you a wonderful Thanksgiving!