Monthly Archives: May 2011

always

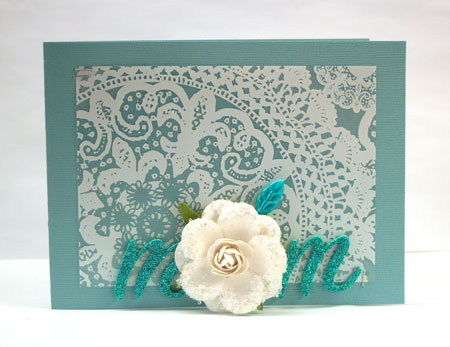
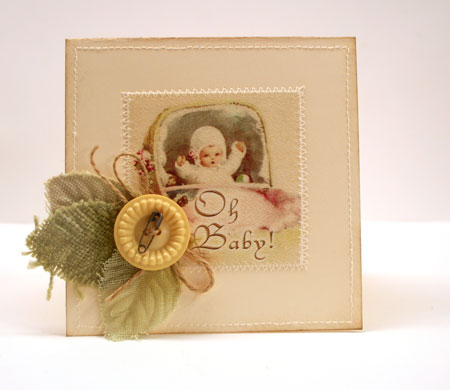
Today I’m in the mood for some shabby style. It’s always a great style for adding texture and I just adore texture.

This card has a unique accent on it that I tried out for the first time on this card. It uses my Silhouette craft cutter and the very cool Print and Cut feature. The Silhouette is a really great machine that has so many possibilities. I just love that I don’t have to purchase cartridges and can even design my own cuts if I want to. The Print and Cut image on this card is the very sweet bird and floral accent. This design can be purchased from the Silhouette store and is a House of Three design. What’s so cool about it is that you print it out with your printer and then put it into the Silhouette. The Silhouette will “read” the register marks and then cut it out perfectly.

Very. Very. Very. Cool.

Always Here For You

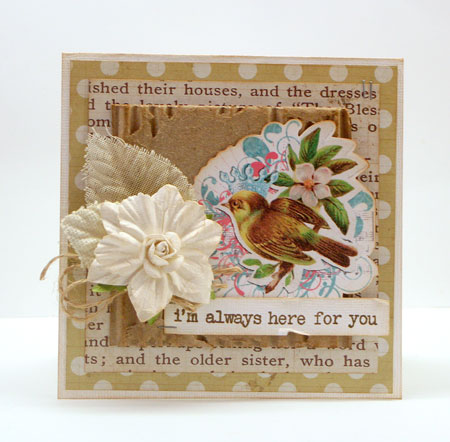
Scavenging corrugated cardboard is a great way to add depth and texture to shabby style cards. Peel off some of the outer texture to reveal the inner core.

Supplies: White cardstock by Bazzill, Cider & Cashmere Sweater patterned paper from Catching Fall line by Lily Bee Design, House of Three Print and Cut image from Silhouette, corrugated cardboard, Tiny Attacher, Brushed Corduroy Distress Ink by Ranger, twine, leaf and Wedding Shoes flower by Prima Marketing, Coffee Archival Ink by Ranger, Thank You for Being My Friend stamp set by Hero Arts

Thanks for stopping by!

Tuesday Thoughts

It’s Tuesday and time for me to share another Avocado Arts design. June’s “Sunshine and Smiles” stamp set is their very first release and I’m having so much fun with it. It’s perfect for not only this time of year, but many elements can be used year long as well.

Pink and orange are one of my all-time favorite color combos. I’m not sure if you can notice but the ink in the coloring on this design and the stamped ink match perfectly. That is because I’ve used Memento Dye markers for both. I love how the brush end is great for both coloring AND brushing ink onto stamps.

Supplies: cardstock by Bazzill, Sunshine and Smiles stamp set by Avocado Arts, button by Jenni Bowlin, twine, Jet Black Archival Ink by Ranger, Tangelo, Rosebud & Pear Tart Memento Markers by Tsukineko

Happy Stamping!

Paper Gift Bow Tutorial

Paper gift bows are so crazy easy to make and  I just adore the custom look. I may never buy another gift bow again! Give them a try and tell me what you think.

Paper Gift Bows Tutorial

Supplies: cardstock or patterned paper, stapler, adhesive

1. Cut strips of paper to these sizes… 3 – 3/4″x10″ strips, 2 – 3/4″x8.5″ strips, 1 – 3/4″x4″ strip

2. Start your bow by twisting each of the five long strips into a figure 8 shape and stapling in the center.

3. Adhere the large three looped strips together and the medium looped strips together.

4. Adhere the smaller strips into the center of the larger. Staple the small strip into a single loop.

5. Adhere the small loop into the center of your bow to finish it.

Use these fun paper bows to decorate packages and gift bags. They are perfect for a coordinated gift or for using of scraps of paper. If you have a 4.5″ x 10″ scrap of paper, you can make this bow. For this project I’ve used the Al Fresco paper from the Picket Fence line by Lily Bee Design.

Happy creating!


Happy Mother’s Day

Happy Mother’s Day!

I hope you’re enjoying a beautiful day wherever you are. The weather here has me smiling with lots of sun and beautiful big puffy clouds. I’m the proud recipient of lots of sweet handmade cards from my littlest ones.

You may have been wondering where I’ve been for the past few days. I’m so sorry I still haven’t gotten that tutorial written for you. I’ll get to it as soon as I can.

Being a mother of five means that now and then things can get kind of crazy with surprises thrown at you that leave all your good intentions in the dust. This week I’ve had a migraine, dealt with the stomach flu…twice, been to Toronto to apartment shop and have been really busy getting my oldest ready to leave the nest.

I’m super excited for him and after many blisters from searching and walking all over the city, we’ve found him a place. He’s the first to leave and I’m being really sentimental right now. Even with a large family, you really notice when one isn’t there. It’s going to be hard but I know it’s time. I’ve gone into super-mother mode this past week too, trying to squeeze in all manner of last minute parenting and tips for living on your own. He’s being very gracious and patient with me. I think he knows how much I’m going to miss him.

This just may be the hardest part of being a mom…learning to let go.


This card is a simple one that highlights the beauty of the transparency. I’ve left out the letter o and replaced it with a flower for mom.

Supplies: flower by Prima, transparency by Hambly Screen Prints, Thickers by American Crafts. cardstock by Bazzill, Trinket Pin by Maya Road

Have a beautiful day!

Mother’s Day…It’s a Wrap

Happiness is homemade. Growing up, your mom is that person who makes every day special. She’s a caregiver, a teacher of life lessons, the nurturer, the one who comforts. Mom is a huge part of making your world a happy place. There is just no one quite like a mother.

I’ll never stop missing my mom. We lost her four years ago to cancer but there isn’t a day that goes by that I don’t think of her and wish I could tell her something. I’d love to tell her again just how special she was.

While I miss my mom, my mother-in-law is a wonderful mom as well. We are so blessed to have her. She’s always been good with her hands and loves everything I create for her. This year I decided to make the gift wrapping special and do a little paper crafting magic for it.

This box is a paper mache box I picked up at Michael’s. I love the look of simple kraft wrapping and the simplicity of the box highlights the pretty trims. I’ve used lots of beautiful Lily Bee Design product to create this gift wrapping.

I love creating gift tags. They are fun, quick and a great way for using up leftover paper crafting supplies. For this tag I’ve used the mother & daughter stamps from the Lily Bee This & That line. They work perfectly for Mother’s Day. The patterned paper is from the Stationery line. It’s a sweet subtle print that makes it a great cardstock alternative.

Here’s a closeup of the paper-crafted bows. I may never buy another again. I love how easy they were to create and how much personality they add to the gift. I don’t have a tutorial made yet on how to create these but stop by tomorrow and I’ll share the how-tos.

Today I’m sharing this project on the Lily Bee Blog. We’re celebrating mothers all week there so stop by and check out some great inspiration.

Supplies: Paper Mache Box from Michaels, twine, Stroll-Happily Lost patterned paper, Mushroom & Cotton Candy patterned paper from Stationery Line, This & That Stamps, Happily Lost Mixed Cardstock Stickers and Happily Lost ABC Stickers by Lily Bee Design, flower by Prima, Kraft Ticket & trinket Pins by Maya Road, Hinge Clip & Tiny Attacher by Tim Holtz, Jet Black Archival ink by  Ranger, White Colorbox Pigment Ink by Clearsnap, Glimmer Mist

Have a great day!

It’s a wrap,

a card creation

One of my very favorite magazines each year is Paper Crafts Card Creations. It’s totally packed with fabulous cards and inspiration that span every occasion you can imagine. This magazine hit the newsstands yesterday and it seriously lives up to all my expectations.

I’m so excited to have a few cards in this issue. My very favorite was shared yesterday on Paper Crafts Connection and so I’ll share my second favorite here with you today. It uses the sweetest fabric image from Crafty Secrets and I love the soft vintage look.

Supplies: Brushed Corduroy Distress Ink by Ranger, Fabric Scrap by Crafty Secrets, leaves by Prima, sewing machine, twine, Vintage Style Sew On Button by Jenni Bowlin, Safety Pin by Tim Holtz

Happy creating!

Avocado Anyone?

Avocado anyone?

Avocado Arts that is!

Today I’m excited to bring you my first Avocado Arts project using June’s stamp club set.

For those of you who haven’t heard, Avocado Arts is a brand new stamping company. It’s a great monthly kit club of fabulous photopolymer clear stamps. The images are fun & graphic with a touch of whimsy and each set is designed to work with previous releases. The possibilities will be endless. I’m excited!

It’s been a while since I’ve watercolored. Way too long! These darling rubber boots were just begging for a water puddle to splash in and the best way I know of to do water is with watercoloring.

I like to watercolor using ink pads and a waterbrush. You can press the ink pad into the lid or onto a scrap piece of plastic to squeeze some of the dye from the ink pad. If you look at the original images, you’ll notice that I’ve done a little masking to put this scene together.

Quick Tip: When watercoloring, use a porous paper that is designed to help the ink move well.

Avocado Arts will be sharing daily inspiration using their first release for the entire month of May. To make sure you don’t miss a thing, keep an eye on the Avocado Arts blog. You can also follow them on Facebook and Twitter.

Here’s the schedule for this week’s project lineup…

May 1 – AJ Otto
May 2 – Latisha Yoast
May 3 – Julia Stainton (you are here)
May 5 – Becky Oehlers
May 6 & 7 – Join us on the blog for a project re-cap

Supplies: stamp set by Avocado Arts,  Jet Black Archival ink by Ranger, Tumbled Glass Distress Ink & Dried Marigold Distress ink by Ranger, waterbrush, Rosebud Memento Marker by Tsukineko, Soft White Cards by Arturo

Happy stamping!