Monthly Archives: November 2010

Triple fun

1,2,3…. Creating holiday cards can be that easy and fun. I’ve decided to finish up sharing my Mitten Weather cards with you today. Sunday I shared one, Monday it was two and today you get the final three. All the cards have been created from one 6×6 Mitten Weather paper pad and a Mitten Weather Ready Set Chip Chipboard sheet from Cosmo Cricket.

There’s a lot to cover today so let’s get started…
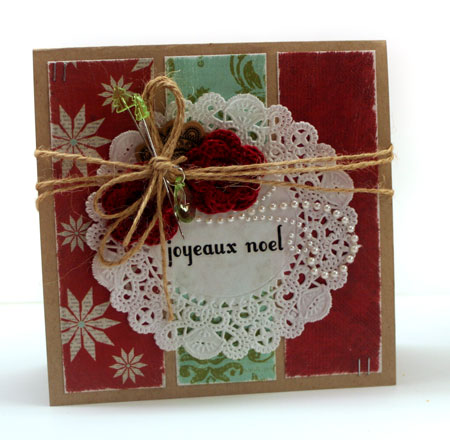
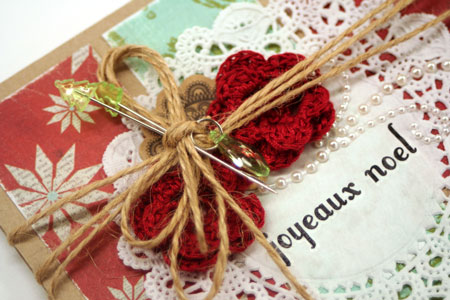
Joy Card

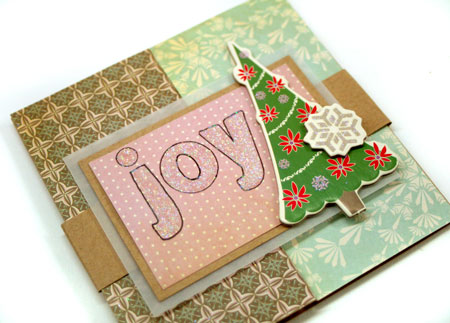
Today’s first card is a barn door fold card which means it opens from the middle. This card measures 4.25 inches square so to do the fold, cut your cardstock 4.25″ x 8.5″. Instead of scoring down the middle, you’ll want to score 2 1/8″ from each side so that your flaps fold towards the middle. I’ve taken this card a step further and created a belly band for it. This means that the kraft cardstock band around the middle slides over the card and off.

Quick Tip: Create a sentiment from chipboard letters without using them up. To create the joy sentiment, I traced around some chipboard Thickers letters and then removed them. The glitter was applied with a Quickie Glue Pen inside the tracing.
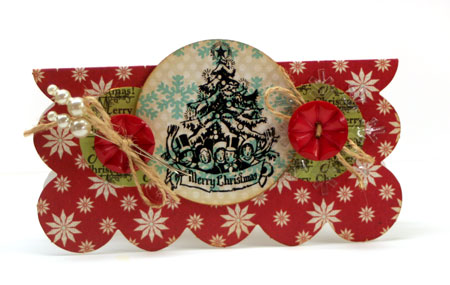
Love From Our House

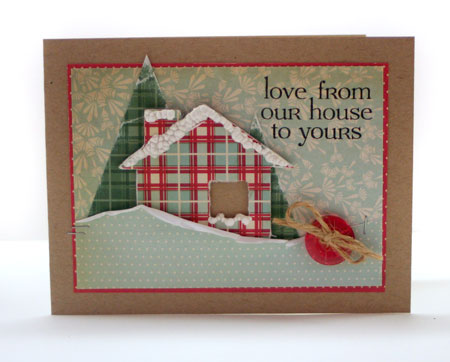
Creating scenes from paper is one of my favorite things to do. This sweet little Maya Road chipboard house is covered with Mitten Weather paper and then some Liquid Applique snow. To achieve this look, simply squeeze on your liquid applique and then apply heat with a heat gun until it puffs up.

Quick Tip: You can use sentiments from other occasion sets on Christmas cards if you get creative. The “love from our house to yours” sentiment is from the Hero Arts Mi Casa stamp set.

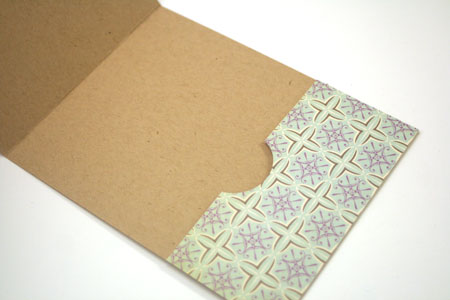
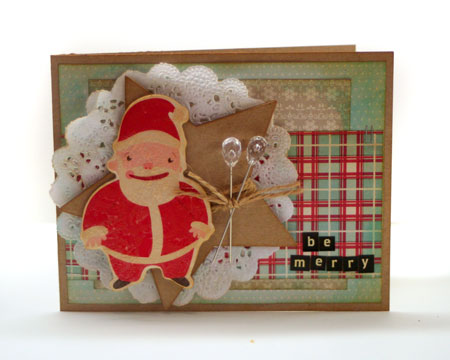
Ornament Gift Card Holder Card

And finally, the last design. It’s a gift card holder when you lift up the top flap. I created this fold design way back in September 2007 and have just updated it here. If you’re looking for the original tutorial, you can find it here at Pocket Card Tutorial.

Since I’m trying to stay on track with getting these Christmas Cards out, here’s my latest update. Cards are all made and yesterday I sent in the photo card insert I designed for printing. I usually print at home so I was amazed when I sent my order of 65 prints off to Wal-mart online. They were ready in 5 minutes. Unbelievable. I love technology! My job today is to buy more envelopes and get writing!

Take care and enjoy your holiday prep!

one paper line…two looks

I love creating with papers that can lend themselves to many different styles. Today I have two more holiday cards and they are both created with the Mitten Weather 6×6 paper pad from Cosmo Cricket. One paper pad and chipboard sheet can give you a myriad of different cards to create for the holidays.

Vintage Merry Santa

This Santa looks cute and trendy straight from the chipboard sheets but it’s easy to make him look a little vintage. I’ve covered him with Rock Candy Distress Crackle Paint and a little Distress ink for a fun look.

Noel

While I love distressing, I also love the crisp and clean look too. For this simple project I’ve used up lots of scraps, rounded the corners and substituted the O in noel for a chipboard snowflake. Substituting elements for text is a tried and true design trick.

Have a fabulous Monday!

Happy Holly Days

Finally we have some snow!

It’s not much but still, I’m happy for a little snow to get me into the holiday mood. I’m more than half done my shopping too and Christmas decorations are finding there way throughout the house. It feels good to feel like the holidays are finally underway. This week my major goal is to get those cards mailed out. One of them that I’ll be sending, I created for a class I taught last week.

Happy Holly Days

This card uses the Cosmo Cricket Mitten Weather line. I’ve distressed the papers and chipboard for a vintage look.

Supplies: Mitten Weather 6×6 paper pad and Ready Set Chip Stickers by Cosmo Cricket, Black Tiny Type by Cosmo Cricket, twine, sanding block, Tree Trinket Pins by Maya road, kraft cardstock by Bazzill

Thanks for stopping by!

That’s the Ticket

Happy Thanksgiving to all my American friends. I hope you enjoy a wonderful day of thankfulness, friends and family and food. Eat a piece of pie for me, OK?

Today’s card is for this week’s Ways to Use it Challenge…Tickets. I’m totally taken with the ticket trend. I actually have quite the collection from kraft ticket embellishments to chipboard, from stamps to vintage tickets. I thought it would be fun to create a ticket-themed Christmas card for a different spin on things. I’ve used kraft mini tickets from Maya Road and a stamped ticket for the sentiment using the Tim Holtz ticket themed Odds and Ends stamp set. If you have some time to play along…we’d love to have you join us here.

Ticket to Christmas Card

For this card I tried out a new ink pad, Crimson Archival Ink by Ranger. It’s a stunning red color and I’m quickly becoming addicted to all the Archival Inks. They are permanent when heat set and give a beautiful deep impression every time.

Supplies: grey cardstock by Bazzill, 6×6 Jovial Paper Pad by Basic Grey, Jovial Chip Sticker Shapes by Basic Grey, sewing machine, Tim Holtz First Christmas Stamp & Odds and Ends Stamp Set by Stampers Anonymous, Kraft Mini Tickets by Maya Road, Jet Black Archival Ink, Crimson Archival Ink and Frayed Burlap Distress Ink by Ranger, Wood Bingo Motifs by Maya Road, Red Vintage Sew-On Button by Jenni Bowlin, twine

card creations favorite occasions

I love special occasions and they are always better with a special card to say you care. The new Paper Crafts special issue Card Creations: Favorite Occasions was released last week and it is a super fabulous issue. I was so excited to get my artist copy and have sat down to enjoy it many times in the past week. Clever cards, cute cards, beautiful cards, trendy cards…it’s all there and worth having on hand for inspiration. If you’re looking for a copy you can find it at your local craft or bookstore or at the link above.

I was thrilled to have quite a few projects in this issue and have one to share with you today. It combines my love of doilies, twine, text, flowers, stitching and Lily Bee Design papers.

Flower Doily Card


Now I’m off to start my busy day. Lots of errands, Christmas shopping and my Mitten Weather Christmas Card Class tonight. Whew!

For those of you in the USA, have a very happy Thanksgiving and safe travels.

Christmas Town

I love creating Christmas cards to give out each season. I’m really excited that I’m almost done. Next week my goal is to get them all signed, addressed, and in the mail.

Over the past few days I’ve been creating holiday cards with the Lily Bee Design Christmas Town line.

Joyeux Noel Card

Supplies: Christmas Town patterned paper & rub-ons by Lily Bee Design, doily, Tiny Attacher by Tim Holtz for Advantus, crocheted flowers by Imaginesce, sanding block, twine, Christmas Tree Trinket Pins by Maya Road, Kiwi Chandelier Crystals by Heidi Swapp, Krafe Doily by Maya Road, peral flourish by Zva Creative

Vintage Tree Christmas Card

Quick Tip: Chipboard will die cut but trying to use your punches on it can be rather difficult to say the least. Make your own “faux” chipboard by punching your shape multiple times from kraft cardstock and then adhering together. Oh this project it added the dimension and stability needed to the main circle image.

Supplies: Christmas Town Patterned paper, rub-ons and die cut sheet by Lily Bee Design, twine, buttons by Jenni Bowlin, Circle punch by Marvy, snowflake by Heidi Swapp, Pearl Trinket Pins by Maya road

Today I’m posting on the Lily Bee Blog, these two cards and a couple others. Why not stop by?

Have terrific Tuesday!

giving thanks…a digital gift & tutorial

Today I just want to say thanks.

Thanks for stopping by.

Thanks for taking the time to visit my blog.

Thanks for all the lovely comments you all leave.

Thank you for your friendship.

Today I thought I’d share a digital file I created a while back.

How can you use it? Just click on it to enlarge and then save it to your computer. You can print it off and use it as a card front, make an inspirational frame or even print on iron on transfer paper and iron it onto some fabric. Please feel free to use this file for your personal use only.

Giving Thanks in All Things – a digital printable gift

Here’s a reposted tutorial for a pillow I made using it last year. You just need to convert it to black and white first.

Transfer Art

It’s totally amazing how many things you can do with digital art once you start playing around with it. Lately I’ve been on a home decor kick and thought I’d try my hand at creating my own
Giving Thanks Canvas Pillow. I’m loving the concept that crafting projects can be practical and inspirational at the same time.


To create my pillow, I started out with some simple supplies…canvas, sewing machine and thread, my digital file, Avery T-Shirt Transfers and a pillow base. You can use a purchased pillow form but I kept this project inexpensive and simply covered up an old pillow that I just didn’t love any longer.

The Avery T-shirt transfers work well on cotton and cotton/poly blend fabrics and use an ink jet printer. I purchased mine at Staples but you can also find this product on-line or at other office supply stores.

The Giving Thanks Printable suited my thoughts for this time of year. I could have used the color version but decided to use the black and white image as I loved the graphic look of all the text. One thing you need to keep in mind when printing images is that they will be iron=on backwards. That means if you are using text, you’ll need to flip your image to make it print in reverse. There are many ways to do this depending on your software. I use Photoshop Elements and it’s very easy to do. Hit Print or Ctrl P to print your image. You’ll get a screen like my screen shot below. Simply check the flip image box and you’re good to go. If your computer doesn’t have this function…try sticking to images without text.


One other thing to mention…I actually resized the Giving Thanks Printable for this project to 6″ square.


Follow the Avery instruction sheet included in the package. Iron with no steam with firm pressure for best results. Allow to cool then carefully remove backing.

To create your pillow cover, cut (I like to tear on grain) your fabric to the desired size. I uses 21″ panels. Pin edges with outsides facing in. Stitch around edges leaving a space on one side for turning. Turn right side out and press well. Insert pillow form and stitch closed.

My pillow cover ended up a bit too large for the insert so I took the project one step further. I created a border by pinning the excess on all sides together and then stitched an even distance around the perimeter of the pillow.


So that’s it! A fun pillow. It might be fun to sew another with a holiday image next. Also…think about all the possibilities for the Iron On T-shirt Transfers. How about ironing an image on an apron, a premade canvas tote, a pencil case or some other creative idea.

Hope you enjoy it! Happy creating!