Monthly Archives: July 2010

simply tidying up

Sometimes I have lots of scraps on my desk and the easiest way to clean them up is to not put them away but make them into a card.

This is one of those cards.

special-friend.jpg

I love adding bling to almost everything. This beautiful and elegant brown  flourish and the beautiful red corduroy brad are from Zva Creative.

Supplies:corduroy brad BR01CB104 & brown flourish pearls

PE02CB 119   by Zva Creative,  doilies by Little Yellow Bicycle, kraft and white cardstock by Bazzill, twine, Library Pocket by Maya Road, Tiny Type by Cosmo Cricket, stamp by Gina K Designs, 4×4 mini papers by Jenni Bowlin

Happy Saturday!

happy

What makes you happy?

For me it’s many things. My husband, my family, creating, faith and many simple things.

I recently came across this old photo of my daughter and yes, it made me happy.

What more of an excuse do you need to create something?

This layout is today’s CLASSroom post with step outs on creating the background. Why not join me here?

u-make-me-happy.jpg

Quick Tip: Stitch a frame to anchor your design.

Wishing you a very happy weekend,

hello sunshine

I think by now that you are quite aware that I love summer.

What’s not to love?

Our favorite summer place is at the lake enjoying the water and sunshine.  This year my daughter learned how to wakeboard and this layout documents her success in a fun way. I just can’t seem to get enough of this Hello Sunshine line by Lily Bee Design. This layout is on the Lily Bee blog today with a few ways to use and alter patterned paper. I hope you’ll stop by and check it out.

hello-sunshine.jpg

Quick Tip: use a super sized rub-on for an easy title

Have a super “sunshiny” day!

card style

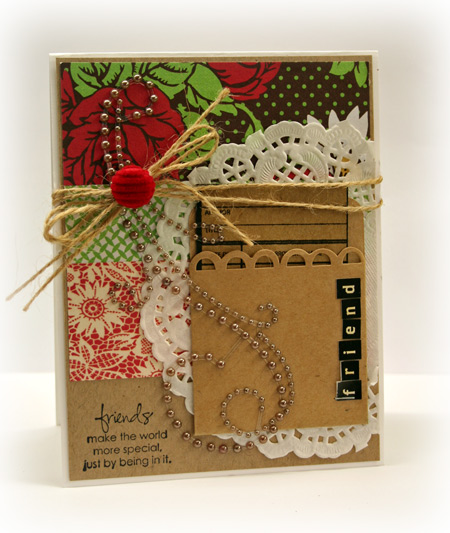
Do you know that old saying, Christmas in July? Well, today I have a little Christmas in July inspiration to share with you.

You may have noticed I’ve missed a few days that I don’t usually here on my blog. Did you miss me? In between summer activities and migraines, things have just been a little topsy turvy here. I thought that sharing one of my Card Style projects would be the perfect solution in giving me something to share and say hello while I work on getting back on track.

Card Style is the latest Paper Crafts Special Publication and today’s project is one of the projects I had published in this magazine. If you haven’t seen it yet…it’s fabulous and definitely a keeper. You can find Card Style at your local scrap or book stores or on-line direct from Paper Crafts Magazine.

Surprise, surprise (wink), all my designs were for the Shabby Chic/vintage category and this festive Webster’s Pages creation combines many of my favorite things.

  • distress crackle paint – check
  • twine – check
  • stitching – check
  • pretty muted colors – check
  • buttons – check

believe

believe-christmas-card.jpg

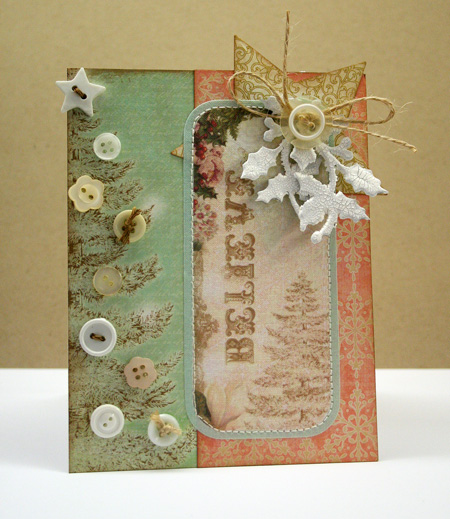
Supplies: Home of the Holidays Petite Papers , Fabric Fancies by Webster’s Pages,  buttons by Melissa Frances, Brushed Corduroy Distress Ink by Ranger, sewing machine, twine, Classic Star Die by Spellbinders, Picket Fence Distress Crackle Paint by Ranger, grungeboard by Advantus

Have you started on your holiday cards yet? I have a few like this card above all ready in a stash for later this year. After a few abysmally chaotic years I’m committed to sending out cards this year. Hold me to it!

Thanks for stopping by!

live…

I’ve been busy exploring some fun products I’ve been wanting to create a layout for, well, for a very long time. Sometimes a challenge is just the ticket to get you started and so I combined the technique I wanted to try with this week’s Creative Scrappers Sketch. Sketch 114 is revealed today at Creative Scrappers and it’s a fun sketch. I love the way the small photo has a large mat and most of the embellishments are all grouped together.If you like to design sketches, they are also having a Sketch Team Call that you may want to check out here.

julia-114-revised.jpg

This background was created on some really cool embossed chipboard sheets. The product is white with white embossing and you sponge ink on top of it to reveal the pattern. Using different inks and blending them gives you a myriad of color combos and options for an artsy look. There was another sheet in the package so I’m looking forward to trying this out again to get another look soon.

Quick Tip: Create a watermark look after inking by flicking drops of water over the surface and then removing the ink by blotting with a tissue.

inking-closeup.jpg

Supplies: Invisibles Chipboard Sheets by Advantus, Distress Inks by Ranger, Mini Mister by Ranger, ric rak, Printed Canvas by Prima Marketing, dymo label maker, Leaf Pins by Maya road, twine, chipboard button by Jenni Bowlin, Thickers by American Crafts, Wood Bingo Calendar Numbers by Maya Road, white Mulberry Rose Leaves by Prima

Have a beautiful day…

silk ribbon roses

I’m seriously addicted to making my silk ribbon roses since I started creating them a few weeks ago. I know you’ve liked them too and so today, I have another project using one. Better yet, I’ve created a tutorial for the CLASSroom to share with you and I hope you’ll enjoy it. Check it out here.

wishing-you-all-things-wond.jpg

Wishing you all things wonderful this weekend!

let’s get moving

This week has been just flying by. So much for lazy summer days. I guess it’s so much easier to have them when you’re the child rather than the mother. I’m looking forward to some lazy days at the cottage once hubby can get a few days off work.

It’s Thursday again and time for another Ways to Use it Challenge.  This time it’s going to be more of a Ways to MOVE it challenge. I’m challenging you to find ways t o make your cards interactive and have moving parts. I chose a rather simple idea with making moving wheels on this sweet little Hero Arts bike stamp. You might want to make it more complex. How about a pop up card? Perhaps you could have an envelope that you had to open for the sentiment. However you decide to move it, I hope you’ll play along with us today. Find the challenge here.

Let’s Catch Up

lets-catch-up.jpg

Quick Tip: To get the wheels to turn smoothly I place two tiny washers on the brad between the two paper layers.  This also pops the wheels up slightly.

catch-up-close.jpg

Supplies: kraft and white cardstock by Bazzill, twine, patterned paper by Crate Paper, Leaf Trinket Pins by Maya Road, Bicycle stamp by Hero Arts, sentiment from Oceans of Joy stamp set by Hero Arts, Jet Black Archival Ink by Ranger, Memento and Tombow markers, flocked brads by Doodlebug Design, Clear Glaze Pen by Sakura, White Opaque Pen by Ranger, Tim Holtz Washers

Happy creating!