Monthly Archives: November 2008

Some more monochromatic images … a simple technique

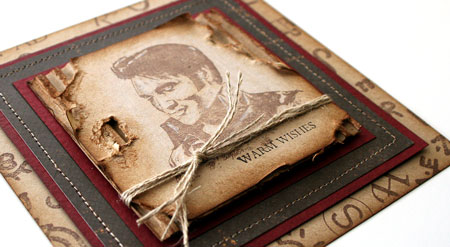
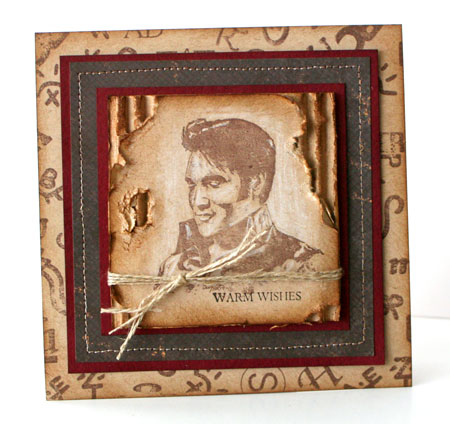
I’ve been having fun playing around with one simple little product…the white colored pencil. Ever so humble…I really never thought of it much until the past week and now I can’t seem to put it down. Inspired by a design of Kim Hughes where she colored an image all in brown pencil…I decided to try my own version by just adding in  highlights using white. I love the monochromatic and vintage look of this simple technique. It brings me back to high school art class and reminds me of those conté crayon sketches we drew.

White Pencil Highlight Technique

  1.  Stamp line art image in brown ink on Kraft cardstock. I used Rich Cocoa Memento Ink. Detailed lines work best.
  2. Study your image to see where the highlights or light spaces would be. Color in lightly with white pencil.
  3. Go back and add stronger white highlights where needed to add extra dimension.

Chocolate Santa

jks-chocolate-santa.jpg

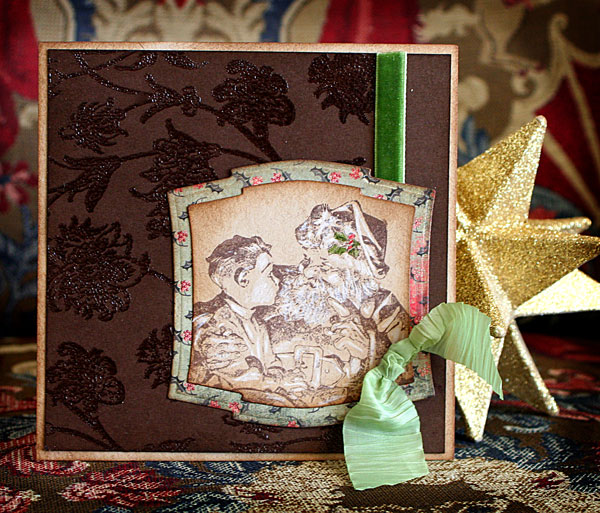
I am totally in love with this Santa’s Lap image! It’s actually a very large stamp but I wanted to focus in on darling expressions on the faces and die cut it down to my focal point. Using red and green colored pencils…I also highlighted the sprig of holly on Santa’s hat. To create the background I stamped the Ornamental Vines Backgrounder in Versamark on Suede Brown Dark cardstock andembossed with clear embossing powder.

Stamps: Ornamental Vines Backgrounder, Santa’s Lap (Saturday Evening Post line) by Cornish Heritage Farms
Ink: Versamark by Tsukineko, Vintage Photo Distress ink by Ranger, Rich Cocoa Memento ink by Tsukineko
Paper: kraft and suede brown dark cardstock by Prism, Basic Grey 6×6 paper pad
Other: ribbon by Making Memories, velvet ribbon by May Arts, clear embossing powder by Ranger, pencil crayons by Prismacolor, Spellbinder dies

55 Corvette Wishes

jks-55-corvette-wishes.jpg

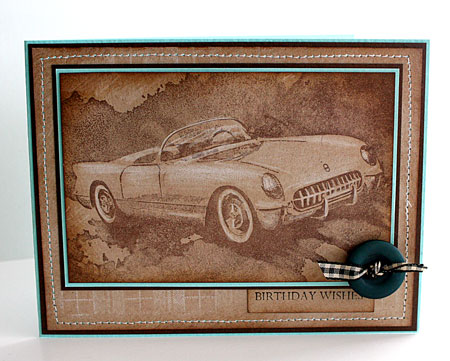
As I couldn’t stop with this technique…I had to try it out on this new Corvette Image by Cornish Heritage Farms.

Quick Tip: Try switching the Kraft cardstock to another medium toned hue for a different look.

Supply List:
Stamps:
1955 Corvette (GM line) By Cornish Heritage Farms
Perfect Plaid Scrapblock™ by Cornish Heritage Farms

Ink-Vintage Photo Distress Ink by Ranger,White Adirondack Pigment Ink by Ranger, Rich Cocoa Memento Ink by Tsukineko

Paper:Kraft, Frosted Teal, Suede Brown Dark by Prism

Other: sewing machine, button by Autumn Leaves, ribbon by creative Impressions, white colored pencil

Thanks for stopping by! Wishing you a beautiful Sunday!
a-signature-2.jpg

Quick and Easy!

While some days I like to make more involved card designs, a lot of the time…quick and really is my favorite way to go. Why? Well…it seems that the days just keep getting busier and busier. Seriously…I always thought teenagers had to be less work than toddlers but now I’m not so sure! And of course… mixing up the two is a very special challenge! LOL I don’t do things by halves, do I?! I’m sure you have a super busy life as well and I hope you’ll give yourself “permission” to make quick and easy card designs too. It took me a while to get the concept that more is not necessarily more! To create quick and easy designs that are still “me”, I like to mix stamping, paper and fun embellishments together for an eclectic mix.

Once Upon a Time

jks-once-upon-a-time.jpg

This design is published in the latest special publication from Paper Crafts ,  Card Creations Quick and Easy. It goes on sale this coming Tuesday and you can also find it on-line from CK Media. If you’re looking for some cool quick and easy cards…this is perfect for you.

Have a simply wonderful Saturday!
a-signature-2.jpg

In the Holiday Spirit

I am SOOO getting into the holiday spirit this year. Last year was hard and I didn’t quite get into it until Christmas was almost upon me.I also just CANNOT stop creating which is why you’re getting so many designs out of me! LOL Another couple again today. As you can see… I STILL haven’t put away my TK Christmas Series paper. It makes beautiful holiday cards so quickly!

Thomas Kinkade Inchie Christmas

jks-inchie-christmas.jpg

For this design I decided to try cutting up one of the 4×4″ size images into one inch squares and adhering them to inchies. I love how it really gives the look of looking out through a window and adds dimension to the design.

 Quick Tip: Sponge the edges of your inchies to add a vintage look and define the squares a little more.

Supply List:
STamps: A Merry Little Christmas (Thomas Kinkade line) by Cornish Heritage Farms

Paper:

-Thomas Kinkade Christmas Series paper pack
-kraft and blue prism cardstock

Ink:
-Vintage Photo Distress ink by Ranger

Other:
-brad by American Crafts
-inchies

-snowflake ribbon by Making Memories

 Christmas Trio


jks-tk-trio.jpg

This tall card design features some of the smaller 1.75″ square images that come with this paper pack. Each of these little vignettes features a slightly different focal point from the original painting. It’s a super easy way to get a festive look.

Stamps:
-Christmas Expressions (MLM) by Cornish Heritage Farms

paper:
Thomas Kinkade Christmas Series paper pack by Cornish Heritage Farms
-kraft cardstock by Prism

Ink:
-Brushed Corduroy Distress ink by Ranger
-Tuxedo Black Memento ink by Tsukineko

Other:
-ribbon by Making Memories
-brads by Creative Impressions

I hope you all have a wonderful weekend! I’m going to try and get busy getting organized for Christmas. I think I have some shopping, cleaning and decorating on my to do list. I’m hoping for a little creating too! Anyone have any exciting plans?

a-signature-2.jpg


Holiday Thanks

It seems that each year we have so much to be thankful for! While it’s not Thanksgiving here in Canada…I believe in having a thankful heart each day of the year. It’s amazing how much it changes your attitude when you look for things to be thankful for in every situation. I just wanted to take the time to thank each of you, my readers, for your encouragement and support and comments each day of the year. They never fail to make me smile and inspire me. I want to wish everyone who is celebrating Thanksgiving today a safe and blessed holiday. I wish I was celebrating with you! 🙂

Today…I thought it would be most appropriate to have a Ways to be Thankful Challenge. Whether you create a Thanksgiving card or project, a thank you gift or card….I can’t wait to see what you create! Check out the challenge here.

For this challenge I’ve created a thank you card for a friend this holiday season. While it doesn’t say thank you on the outside (just the inside), I think you’ll agree that the kindness sentiment works beautifully for a thank you card. The fir branch and sentiment are a sneak peek at CHF’s December Stamp of the Month.

Kindness Holiday Thank You

jks-kindness-holiday-thank.jpg

Quick Tip: To get the look of layers, stamp branches in two different colors of green.

Have a fabulous day and happy stamping!
Julia

Stamps: Fir Branch Dec. SOTM set
Ink: Oregano & Pesto Adirondack Ink, Brushed Corduroy Distress ink by Ranger
Paper: Basic Grey 6×6 paper pad, Simply Smooth White cardstock by Prism
Other: ribbon by Creative Impressions, dies by Spellbinders, Faux Snow by Art Institute

A little Western…

jks-western-elvis-flat.jpg

I have to tell you…I had soooo much fun making this card! I’m loving the masculine, textured look. You’re going to be seeing a lot more corrugated cardboard in my designs as I like fun additions. For this design I stamped this new Western Elvis stamp by Cornish Heritage Farms onto some Kraft cardstock before adhering it to my cardboard. It was then really easy to pull back edges and distress.

Rugged Elvis

jks-western-elvis.jpg

The technique I used for the Elvis image is really just a dark brown image stamped onto Kraft Cardstock. Using white colored pencil, I shaded in the highlights of his face, clothing and background for extra interest and dimension. I’ve been having so much fun with this simple concept. It adds a fabulous vintage look.

If you’re looking at the corrugated cardboard…Prima makes a Down Home Kit with yummy “down home” embellishments. I got mine from Jacksonbelle Embellishments. Lindsey is having a sale today through Monday. To get 20% off your order…just use the code THANK08.

Have a fabulous day!
a-signature-2.jpg

Supply list:

Stamps:
Western Elvis by Cornish Heritage FArms
Classic Essential Expressions (Mona Lisa Moments line) by Cornish Heritage Farms
Cattle Brands Backgrounder by Cornish Heritage Farms

Ink:
-vintage Photo Distress ink by Ranger
-Rich Cocoa Memento Ink by Tsukineko

Paper:
-Kraft and Crabapple Dark cardstock by Prism
-patterned paper from Thomas Kinkade Masculine Series paper pack by Cornish Heritage Farms

Other:
-cardboard by Prima Marketing
-linen thread
-white colored pencil
-sewing machine

Sweet as Honey…

jks-hello-honey-detail.jpg
Today I have a sweet design to share with you that I made for my honey. It uses the new Kim Hughes stamp set, The Birds and the Bees. It’s so darling and fun and so, sooo Kim! 🙂

Hello Honey

jks-hello-honey.jpg

A few design notes:

  • adding burlap and lots of other texture gives a great look…especially this time of year
  • to add dimension I added a Tim Holtz Fragment over my colored beehive and then stamped the outline again onto the top of the fragment.
  • a little free-form flight trail is stitched in linen thread to tie in with the top of the design.

Have a sweet day!

a-signature-2.jpg

Supply List:

Stamps:
-The Birds and the Bees (kim Hughes line) by Cornish Heritage Farms

Ink:
-black Stazon by Tsukineko
-Black Memento by Tsukineko
-Vintage Photo Distress ink by Ranger

Paper:
-Simply Smooth White and kraft cardstock by Prism
-Making Memories patterned paper

Other:
burlap by Prima
velvet ribbon by Webster’s Pages
buttons by Autumn Leaves
Acrylic Fragment by Ranger
linen thread

A little whimsy

I don’t know what it is about these whimsical images but I have so much fun coloring them! Bright colors, the fun detail…it all makes it a great change of pace whenever I just want to do something different. When I saw this Christmas Mushroom Lane stamp image, I just knew I had to order i. Is that tree not cute? And the little snowman?!
Mushroom Lane Christmas

jks-mushroom-christmas.jpg

To color this image, I used my Copic Markers and my Copic Spica pens to add some glitter.

jks-mushroom-christmas-clos.jpg

While it doesn’t show up in my first photo, you can catch a glimpse of the sparkle on the tree balls. Sigh…I wish I could get a good photo of the sparkle as it is on the snow, the windows, the bows etc. I paired up the image with some fun Fancy Pants Designs patterned paper and played up on the pink and red combo for a fun look. My favorite detail is the little jingle bells tied to the gingham ribbon.

Quick Tip: For large images such as this, use a 5.25″ square card base to allow for room to embellish your design.

Wishing you a great start to your week! Have fun getting ready for the holidays!
a-signature-2.jpg

Supply List:

Stamps:
Christmas at #19 Mushroom Lane (Classic Collection) by Cornish Heritage Farms
-sentiment from Joyeux Noel (Classic Collection) by Cornish Heritage Farms

Ink:
-Black Memento by Tsukineko
-Vintage Photo Distress ink by Ranger

Paper:
-Blush Red Dark by Prism
patterned paper by Fancy Pants Designs

Other:
rhinestone by MAMBI
Copic markers and Spica glitter pens
-red gingham ribbon by Creative Impressions
-jingle bell from Michael’s
-hole punch