Archive for September, 2008

Sep 30 2008

What’s up…some news and a tweet card…

Published by Julia Stainton under Blog Misc, Card Designs

I have lots of things to tell you about today as well as a project to share so I’ll get right to it! :) First of all…my latest free on-line class at Cornish Heritage Farms is tonight and I’d love to have you join us!

I also have a couple new classes to tell you about. They are absolutely fabulous projects by some of the CHF DT and I know you’ll love them. Check them out by clicking on the banners.

jks-santa-banner.jpg

jks-val-banner.jpg

Also…what are you doing this Saturday? It’s World Cardmaking Day and we have some great things planned at Cornish Heritage Farms. Some challenges to get you creating, chat and over course…some great giveaways. Hope you’ll join us! Check it out!

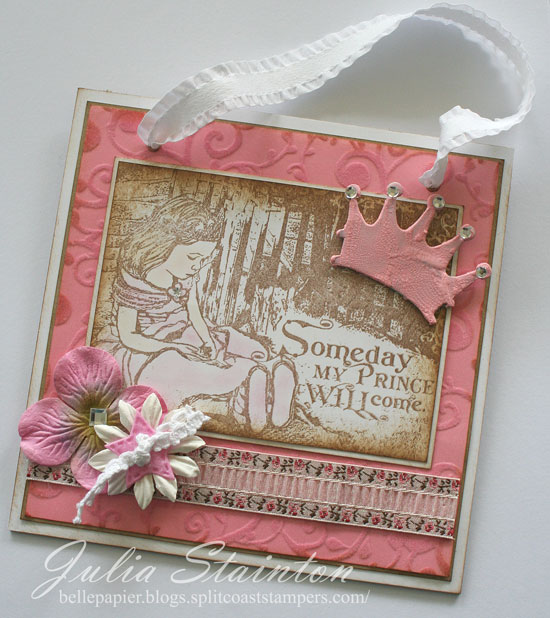
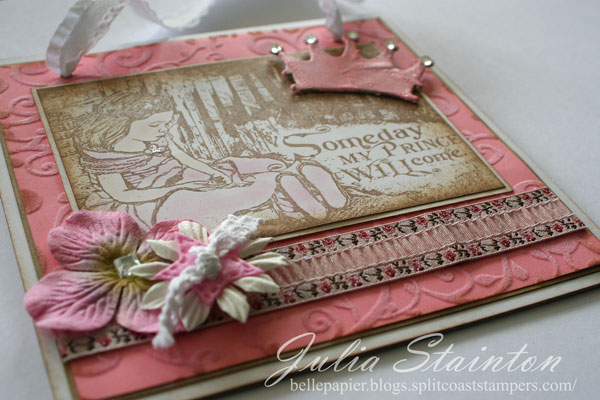
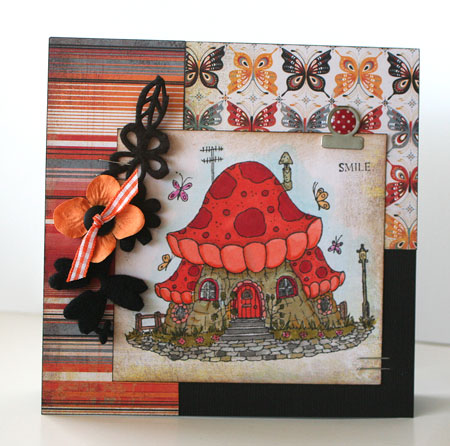
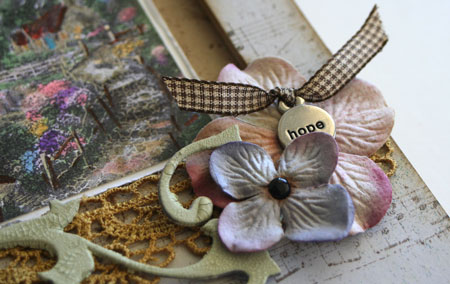
And finally…a sweet card design. Well…I think it is anyway. ;) Hope you like it!

Hello Chica

jks-hello-chica.jpg

jks-hello-chica-flat.jpg

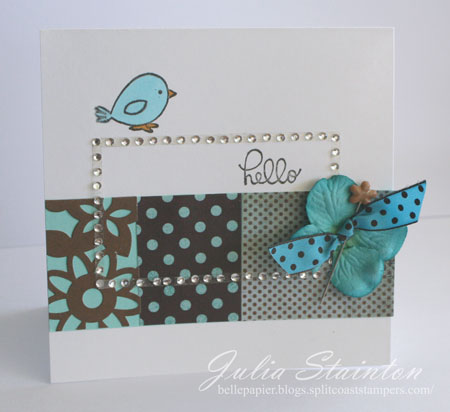
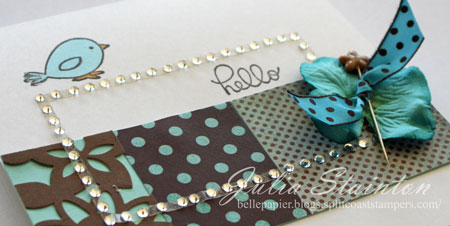
It’s another of those sweet simple cards that just kind of fall together when I’m cleaning up my desk. Seriously…I need some help. I’m a paper packrat! Good job I use a lot of the same colors over and over so that the most disparate elements actually manage to go together. I mean really…I have product from TEN companies here on this little card! Actually…here’s a little secret. I’ve been hoarding the Heidi Swapp bling rectangle for probably 18 months no. I ended up breaking it so I thought I’d better use it up. I put it on my card to encase my sentiment and perched a little stamped birdie on top. Embellishments cover the break nicely. :)

Quick Tip: instead of using bling to highlight or frame a layer…use it as a frame to visually break up the space without one.

What’s up tomorrow? A fun layout challenge from a sketch I designed. See you then!

a-signature-2.jpg

Supply List:

Stamps:
-Mocha Chica (Kim Hughes Line) By CHF

Paper:
-Simply Smooth White Prism Cardstock
-Iced Teal Prism cardstock

-brown die cut paper by KI Memories
-Figgy Pudding 6×6 paper pack by Basic Grey

Ink:
-Black Adirondack ink by Ranger

Other:
-markers by Copic
-bling rectangle by Heidi Swapp
-flower by Prima
-ribbon by Creative Impressions
-pin by Fancy Pants Designs

9 responses so far

Sep 29 2008

Around the house…

I love making altered projects for the home! While I adore making cards and other quick projects, something about a project that will stay in the house or be displayed in another really appeals to me. While I know that papercraft projects don’t last forever, that’s fine but it is fun to have them last while they do. I thought a home dec altered project challenge would be a fun one, especially this time of year as we gear up for the holidays. While my project is not a holiday one, some of the other designers just make have created one. Make sure you check out their great ideas… Kim, Carol, Dawn, Kristine , Val Even better…play along with our challenge here and we’ll come see what you created! I’d love to see your projects!

Princess Wall-hanging

jks-someday-my-prince.jpg

jks-someday-my-princess-ang.jpg

I thought this stamped image would make a darling wall-hanging for a little girl’s room. After all…isn’t every little girl a princess? Pink and girly with lots of flowers, velvet paper, ribbon and bling, it was easy to make. To create my own wall-hanging, I cut a piece of heavy chipboard sheet into a 6×6 square. I think covered it with cardstock and patterned paper. Eyelets were set in the top  with my Crop-a-dile and then a ribbon strung through to hang the project.

Quick Tip: Use a heavy guillotine style paper cutter to easily cut through heavy chipboard.

If you missed Saturday’s post on a chance to win a magazine copy for WCD…make sure you check it out here.

Have a beautiful day!

a-signature-2.jpg

Supply List:

Stamps:
Someday My Prince Collage (Rummage Bin line) by Cornish Heritage Farms

Ink:
-burnt Umber Palette ink by Stewart Superior
-Brushed Corduroy Distress ink by Ranger

Paper:
-Simply Smooth white cardstock by Prism
-Kraft cardstock by Prism
-flocked paper by Chatterbox

Other:
-chalks by I-Kan-dee
-ribbon by May Arts and Melissa Frances
-chipboard crown by Maya Road
-rhinestones by MAMBI
-flowers by Prima

-felt heart by Making Memories
-Worn Lipstick Distress Crackle Paint by Ranger 

11 responses so far

Sep 28 2008

I’m done!

Published by Julia Stainton under Digital Designs

Yay www.jessicasprague.com I’ve finished Up and Running on Thursday and now starting Monday…I’m ready to start Now we’re Rockin! As you can see…I’m totally having fun with this. Now I just need to figure out the best place for getting my layouts printed!

week-four-out-2-play.jpg

week-four-in-the-surf.jpg

Have a beautiful day!
a-signature-2.jpg

4 responses so far

Sep 27 2008

Just one more week…

Published by Julia Stainton under Card Designs

Just one more week until…..World Cardmaking Day! Did you know that Saturday October 4th is World Cardmaking Day? WCD is a fabulous day to set aside to create cards for the holiday. Created by Paper Crafts Magazine…you can visit the WCD site for lots of great inspiration and activities. Make sure you read to the bottom of this entry but first…Here’s what Kelly has to say…

* * * * *

Get ready to celebrate World Card Making Day!

Join in the fun with card makers the world over on Saturday, Oct. 4, as we kick off the holiday card-making season. Now in its third year, World Card Making Day is a day to connect with fellow card makers around the globe and to celebrate the creativity and joy of this craft! Hobbyists, beginning card makers, manufacturers of card-making products, retailers, and educators, are all making plans to share the excitement of World Card Making Day with workshops, online galleries, parties, contests, sales, and other special events.

Visit www.worldcardmakingday.com for ideas and unique ways to celebrate this holiday, including:

o    Creating your own handmade cards from the dozens of sponsored ideas in the Inspiration Avenue section

o    Sharing your unique designs with the world in the Creation Corner Gallery

o    Finding and visiting an Official World Card Making Day Retailer for classes and activities that will help you connect with other fellow card makers

o    Planning your own fun activities with friends and family with ideas from the Celebrate section

Join Paper Crafts magazine on this amazing day that brings card makers from all over the globe together in celebrating the joy of giving the gift of a handmade card.

* * * * *

I’m excited to be part of  a WCD blog hop giveaway from Paper Crafts magazine. Papercrafts has given 50 designers a copy of their Cards, Gifts and More: Papercrafting 3 Ways special publication to share with you. I’m really excited to be one of them. For a chance to win my copy…simply respond to this post in the comments below. You can tell me what kind of card projects you plan to create for this upcoming holiday season or you can simply say hi! You have until midnight Saturday Oct 4th and then I’ll be drawing a winner here on this blog, Sunday October 5th. You can also check out the blogs of some great designers on their link list in their WCD blog post.

Good luck!

a-signature-2.jpg

53 responses so far

Sep 26 2008

A Touch of Whimsy

What’s up today? Well…I’m off on a field trip this morning so I’m looking forward to that with my little guys. It’s going to be a beautiful day so the morning off and some fresh air will be wonderful. I have a fun whimsical design for you today. This Mushroom Lane line is totally growing on me. As I just bought seven of them…perhaps I’m a little addicted? They are so super fun to color and I love the retro look.

Mushroom Smile

jks-mushroom-lane-smile.jpg

After coloring this design with my Copic markers…I added some glitz and sparkle with my Copic Spica glitter pen. Sorry…you can’t see it in this photo but truly…the window shine wayyy more than mine at home! ;)

Quick Tip: Cut up your Queen and Co. felt around the flowers to make a great embellishment instead of a felt band.

Have a fabulous weekend!

a-signature-2.jpg

Supply List:

Stamps: #27Mushroom Lane & Classic Essential Expressions (MLM Line)by Cornish Heritage Farms

Ink: Brushed Corduroy Distress ink by Ranger, Black Memento ink by Tsukineko

Paper: black cardstock by Bazzill, Ambrosia 6×6 paper pad by Basic Grey

Other:

Felt by Queen and Co., flower by Prima, button by Autumn Leaves, tab by Making Memories, stapler

6 responses so far

Sep 25 2008

Week Three…or day three?

I hope I’m totally not boring you!Next class…I promise…just one digi post a week. :) I’m seriously cramming to get ready for it and having a blast while I do. I think by now, you’re getting a good idea of my favorite place to be. ;)

week-three-wakeboard.jpg

the-bend-week-three-assignm.jpg

joy-wip.jpg

I actually created these digi layouts yesterday. I’m just about done the course now and yay! Ready to start the next! I’ll show you my lesson four designs in a few days. Right now…I have a million things I have to get caught up on. This digital scrappin is a little addictive!

a-signature-2.jpg

7 responses so far

Sep 25 2008

Charmed I’m sure

I have a fun challenge for you today. At least I hope you’ll like it! I’ve recently decided to stop hoarding some darling little charms I bought a while ago and just use them. Do you find yourself doing the same thing? Charms are a fabulous accent and embellishment. If they have words on them, I love how they can tie a design together by adding a little thought. Whether your charms are metal or you make your own…find great ways to tuck them into your design. My favorite way to use them is clustered in a group of embellishments such as below on this home decor piece I created. Play along with today’s challenge here.

Steadfast Hope

jks-steadfast-hope.jpg

You may have seen this Thomas Kinkade The Light of Peace image colored here before. It’s one of the ones I colored while away at the cottage and I just knew it had to go into something besides a card. I’m thrilled with the way this altered frame turned out.It’s actually an MDF frame that I picked up at Michael’s and then covered with some Basic Grey paper. To frame the image section, I stamped a couple backgrounders right onto the paper and another on the kraft cardstock behind my image. My hope charm by Imaginesce helps accent the main theme of light and hope.

jks-steadfast-close.jpg

Quick Tip: After coloring with Copic Markers…add in some extra detail with the sharp, fine point of a Prismacolor colored pencil.

Wishing you a fabulous day!

a-signature-2.jpg

Supply List:

Stamps:
-The Light of Peace(Thomas Kinkade Line) by Cornish Heritage Farms
-Inextinguishable Light (Thomas Kinkade Line) by Cornish Heritage Farms
-Cheesecloth Backgrounder by COrnish Heritage Farms
-Aged Sheet Music Scrapblock™by Cornish Heritage FArms

Ink:
-Black Memento ink by Tsukineko
-Brushed Corduroy Distress Ink by Ranger

Paper:
-Simply Smooth white and kraft cardstock by Prism
-patterned paper by Basic Grey

Other:
-lace by Prima
-flowers by Prima
-grungeboard by Ranger
-hope charm by Imaginesce
-Distress Crackle paint by Ranger
-ribbon by creative Impressions
-Copic Markers
-frame from Michael’s

8 responses so far

Sep 24 2008

Still running…more digi pages

Well, I’m on to week two. Actually I’ve just finished it. I’m trying to cram most of a four week course into one as my next course…Now we’re rockin’ starts on Monday! Yikes! Actually…I’m sure I’ll be fine with it. One thing to note…the Up and Running course is on a self-paced format and works wonderful at any speed. This next course is instructor taught and if you want to sign up…you need to pay attention to the web-site. It sells out within 24 hours so sign up for updates!!! Oh…btw…all the digi stuff you see here comes with the class. It’s a great way to get started! Here’s my “week two” layouts. :)

week2_layout-ben.jpg

week-two-wonderland.jpg

I’ll be back tomorrow morning with a stamped project…notice I didn’t say card? ;) And a Ways to Use it Challenge for you.

Take care!

a-signature-2.jpg

3 responses so far

Sep 24 2008

A little paint?

A little paint anyone? Did you know you could stamp with paint? It’s actually a super cool and fun idea. I love the grungy shabby look to it and how paint is opaque rather than soaking into the paper like ink. Now I must admit…I DID go a little crazy with the paint on this design. Actually…it’s a bit of a sampler. You know…like they used to make with different stitches. Well…this card highlights a bunch of paint ideas I was trying out.

Here’s my ideas..

- inking a scrapblock with paint dabber - Old Typewriter stamped on patterned paper

- inking the kissable tree with paint dabber and stamping on a clear card sheet
- freestyle painting the reverse of the clear card sheet to make “leaves”
-highlighting a sentiment by painting behind the word - hello sentiment
-painting paint dabbers over already painted chipboard - chipboard bird

Painted Hello

jks-painted-hello.jpg

Maybe it’s a little over the top for paint but hey! It was lots of fun to make! Ranger Paint Dabbers are the Cornish Heritage Farms product spotlight for the next two weeks. Check out some tips and ideas here.

Have a fabulous day!
a-signature-2.jpg

Supply List:

Stamps:
Kissable Tree (kim Hughes line) by Cornish Heritage Farms
Mocha Chica (Kim Hughes line by Cornish Heritage Farms
Old Typewriter Scrapblock™ by Cornish Heritage Farms

Ink;
Black Stazon by Tsukineko

Paper:
-Iced Teal by Prism Papers
-MochaChica patterned paper pack by Cornish Heritage Farms

Other:
-Clear Card Sheet by Cornish Heritage Farms
-snowcap, Espresso, Lettuce Adirondack Paint Dabbers by Ranger
-Distress Crackle Paint by Ranger
-ribbon by Creative Impressions
-flower by Prima
-sewing machine
-chipboard bird by Maya Road

6 responses so far

Sep 23 2008

Up and Running

I am up and running! With digital layouts that is. After reading a review on Jessica Sprague’s on-line classes by a fellow reporter on Craft Critique…I just had to sign up for a class. Actually…I ended up signing up for two! I wasn’t sure exactly where to start as I’ve been slowly learning to digi-scrap over the past year and a half in my free time. It DOES take a while when you’re learning on your own for the most part but I’ve put together some fun layouts that I’m pretty proud of. I thought perhaps this first class may be a little basic but halfway through…I’m thrilled with what I’ve learned. While I’m used to designing layouts on my own instead of using templates…the hints, free downloads and tricks I’ve learned have really made it worth my while.How come I didn’t know about this MONTHS ago?! If you’re wanting to learn digital scrapbooking or just want to learn more about Photoshop…Jessica Sprague’s on-line classes are a fabulous place to start….and keep learning!

week1layout-together.jpg

beautiful-you-layout.jpg

One of the most basic things I learned was to use the arrow keys to nudge your image or element one pixel in any direction. Wow, wow, wow! This makes my life so much easier. How on earth did I not know this before?!!

These pages are from my first week lesson from Up and Running with Photoshop. I’ll be sharing more as I go along. Hope they inspire someone else to give this a whirl! If you’re looking for stamping…I’ll be back in the morning with a fun stamped card design.

a-signature-2.jpg

4 responses so far

Next »