Archive for February, 2008

Feb 29 2008

A Single Flower…

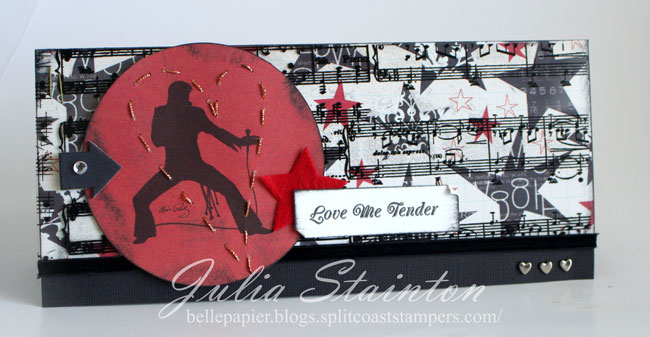
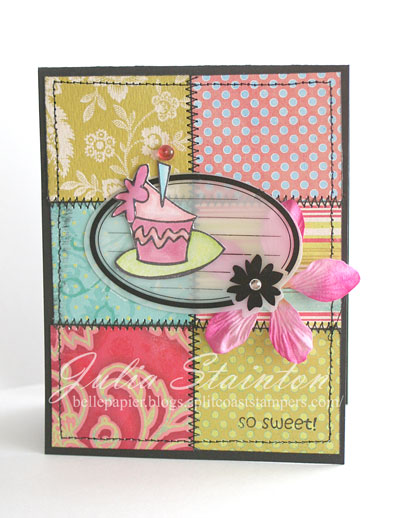
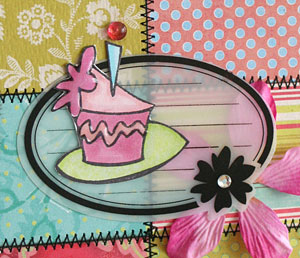
It’s not too often I use just one flower stamp to create a design. A few years ago when I first started stamping, this would have been much more common. I love the idea of going back and creating simple designs. Or maybe…not so simple but with a limitation of earlier days when you had a limited supply list to work from. I love how it stretches your creativity to use stamps and products in new ways. Sometimes I think we lose that. That is what the Limited Supply Challenge is all about. I’m loving today’s challenge…to use a single flower stamp and a single sentiment if desired. No patterned paper, no Cuttlebug. I went a step further and limited myself to a single color of cardstock, using just three layers. Check out the challenge at LSC157 if you’d like to play along! :0

Springtime Friend

jks-springtime-friend-2.jpg

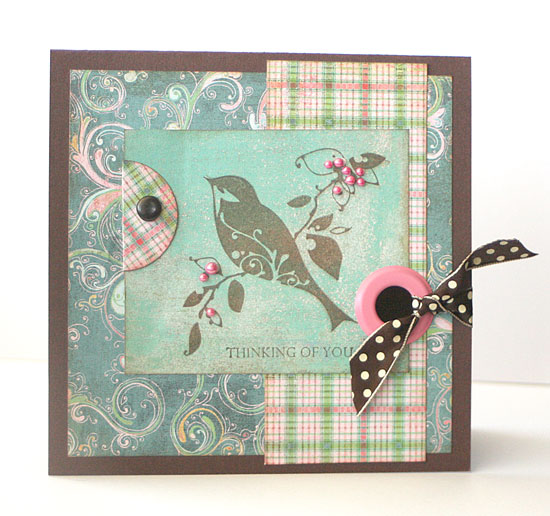
For this design, I simply stamped my flower image multiple times in Lettuce Adirondack ink. This flower is from the Kim Hughes Silhouette Blooms 1 set from Cornish Heritage Farms. After stamping…I dotted my blooms with Liquid Applique and then gently heated with my heat gun. I then lightly sponged on rose colored chalks from my Pebbles chalk set. Very easy and very much like spring. :)

To define my edges, I distressed and stitched them for added interest. The Friend sentiment on this design comes from the Silhouette Blooms 2 set also by Kim. To play up the textural elements of this design, I added a strip of soft green May Arts ribbon and a moss velvet brad from Making Memories.

Thanks for stopping by…again! ….today. :) I certainly did not plan on blogging again but just couldn’t resist this challenge! :)

34 responses so far

Feb 29 2008

Sweet, Sweet Summertime

I love summer and buried in snow right now…I thought it would be fun to scrapbook some of those beautiful summer days. I used a photo I took on the beach last year of our friends’ daughters. It was late afternoon…my favorite time…and its always perfect for taking those silhouette photos. I just love the energy of this photo. I’m not the best photographer that is for sure, but to me…this brings back memories and the joy of being a child.

Summer Joy

jks-summer-joy-2.jpg

This design is a 12×12 layout. It’s a bit of a learning curve for me…going back to where I started…scrapbooking. I’m totally out of practice and I can tell you…this layout looks better in person. But I’m sharing it anyway. ;) Because it’s all about creativity and learning and most of all, having fun. I’m hoping to do more layouts in the upcoming months. It’s always good to stretch yourself and try new things. And…I kind of like the idea of having a scrapbook of memories again. The years are flying by so quickly!

jks-summer-joy-closeup.jpg
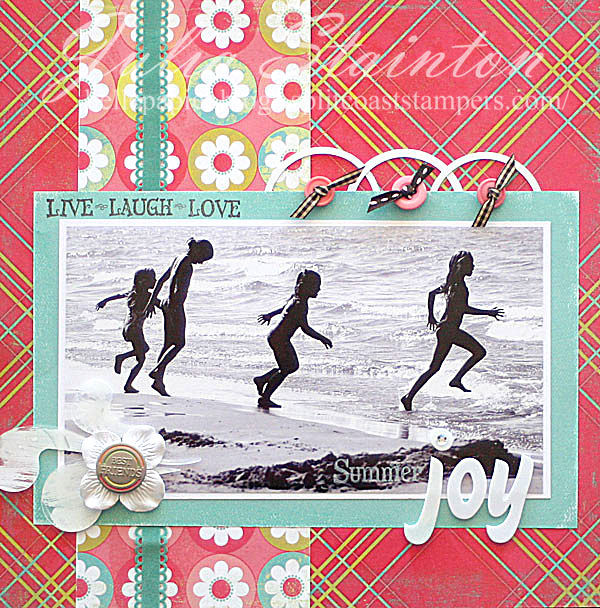
For this design…I blew the photo up to about 9″ wide. I mixed up some stamping and some foam letters for the title…just had some fun. Summer (stamped in white Stazon just before the joy stickers) is from the Great Canadian Stamp Set and Live Laugh Love is from The Art of Framing. Both these sets are from the new Rummage Bin line from Cornish Heritage Farms.

One of the embellishments I was trying to incorporate into this design were some Maya Road clear flourish embellishments that my local scrapbook store owner shared with me. I was looking for different ways to use this product. I created a flourish with three of the translucent pieces and dry brushed white acrylic paint on the reverse side. I allowed it to dry and then adhered it to my design with glue dots. I really love the look in person…it reminds me of waves a little and I think it is a fun addition to this design.

Thanks for stopping by! Wishing you a wonderful weekend!

Supply List:

Stamps: The Art of Framing, The Great Canadian Stamp Set - Cornish Heritage Farms

Ink: White Stazon - Tsukineko, Burnt Umber Palette ink - Stewart Superior

Cardstock: white - Prism

Patterned Paper: aqua from Birdie Collection - Crate Paper, Floral and Plaid from Confetti line - My Mind’s Eye

Other: buttons - My Mind’s Eye, ribbon - Creative Impressions, clear shapes - Maya Road, paint and teal ribbon - Making Memories, flower - Prima Marketing, designer brad - We R Memory Keepers, foam stickers - American Crafts, Circle Template - EK Success

7 responses so far

Feb 28 2008

I’m All Shook Up…

I’m all shook up with today’s Ways to Use it Challenge…music. Be inspired by lyrics, musical images, paper, instruments…anything music related for this fun challenge. Of course…I just had to make a fun card using some of my music projects and these fun new Elvis stamps that Cornish Heritage Farms is releasing today. I’m be honest…when I first heard Elvis I thought…cool, but not my thing. Well…I think I’ve had to rethink that a little because I’m having so much fun with this new line! Love the bold classic images and the great sentiments. Check them out here…. Store, Gallery. If you’d like to play along with today’s challenge…Michele Boyer was kind enough to step in earlier and post it for me…you can check it out at WT155. Thanks Michele! :)

Love Me Tender

jks-love-me-tender.jpg

Well, my five year old woke up this morning with a fever and the flu and I wasn’t quite feeling myself as well. I felt a little better after I’d been up a while and got Ben back to bed so I thought I’d create a fun quick scrappy card for today’s challenge. This Elvis design uses the Jumpsuit Silhouette and Love Me Tender stamps. Simple black stamping using Black Palette Ink makes it super quick. A little stitched cord around the silhouette highlights it and was super quick to do. I’m really disappointed about how this photo came out. It just does not do the card justice. :(

Quick Tip: Use the negative shapes from die cut chipboard sheets to trace shapes for piecing and stitching patterns. It gives you extra mileage from that chipboard package. The heart shape used here was traced from a Basic Grey chipboard package after I had used the heart on another project. :)

jks-love-me-tender-close-up.jpgI’m keeping this post short and sweet as I need to get back to my little guys. For the product list…see below. Have a great day!

Supply List

Stamps: Jumpsuit Silhouette & Love Me Tender (Elvis Line) - Cornish Heritage Farms

Ink: Black - Stewart Superior

Cardstock: Black - Bazzill

Patterned Paper: Mellow 6×6 paper pack (red circle paper) - Basic Grey, Laurel line “Sailmaker Lane” (Star paper) - Scenic Route Paper Co.

Other: Music Transparency - Hambly Screen Prints, circle template - EK Success, copper cord, felt shape and arrow chipboard - Maya Road, rhinestone sticker - MAMBI, heart brads - Making Memories

14 responses so far

Feb 27 2008

Rejoice!

I just wanted to pop back in today and tell you about a great new Inspirational Easter line that Cornish Heritage Farms launched yesterday. Aimee Nugent is our latest artist addition and you are going to adore her style. I’m really excited about her inspirational line. It’s fresh and new and is just what I’ve found lacking in the market! Both the great backgrounders released last Friday are also designed by Aimee. :) If you do wish to purchase any of these new stamps…the best way to find them is with a search using “Easter” or “Inspirational” in the store search engine. Make sure you also stop by the CHF gallery and check out the great samples some of our design team have made. :)

Rejoice!

out-for-pub-sign-oct-07.jpg

I thought this design would work great with today’s sketch challenge layout...SC165. I decided to keep this design light and fresh by using a lot of white cardstock mixed up with some beautiful Two Scoops Patterned paper by Basic Grey. Stamps used are Rejoice Circle and Double Delicate Lily. The center of the lilies was lightly colored with a subtle green Copic Marker and the edges of my layers sponged with Weathered Wood Distress Ink to define the edges.

A few embellishments were then added to take the card design from simple and make it special. I love the Making Memories velvet brads and I added a soft green one to the center of my Prima flower. Five little Dew Drops were then added to balance the design and also a few rows of freestyle stitching up the right side for the same reason. My last embellishment addition was a little scrap of ribbon tied and adhered to the flower stem.

Thanks for stopping by! Check back in tomorrow for a very different look and a rockin challenge. ;)

12 responses so far

Feb 27 2008

Loving these sketches…

I just love checking out new craft books and magazines! In the best ones, there is always a wealth of inspiration to be found. I recently had the opportunity to review a book for Craft Critique and chose one I’ve been wanting to buy since I first heard of it. I love working from sketch layouts and when I heard that Tami Mayberry had designed the sketches for the CardMaker’s Sketch Book it made the top of my wishlist. Tami also designs the sketches each week for the Card Positioning Systems blog. For more information and the whole review…you can check out my article on Craft Critique today. For the instructions for one of the designs…just look below. :)

Friendship Wishes

jks-friendship-wishes.jpg

For this design, I followed one of the sketch layouts in the above book. I love this layout and can honestly say I never would have come up with it on my own. I just love those little sentiment panels! To create this card, I used my Birdie Collection Crate Paper again and stamped on it. Actually…this card uses a grand total of NO cardstock. What I love about Crate Paper is their solid reverse side and I created my card base from the striped patterned paper. I know you can’t see it but the stripes are folded to the inside leaving a warm taupe base for the outside. I love how it adds to the inside of the card design.

I couldn’t resist adding a little stamping to the patterned paper. The Crate Paper stamps on so well with its beautiful matte textured finish. I used three different stamp sets from Cornish Heritage Farms. The flower is from the Kim Hughes Silhouette Blooms 1 set, the ornamental shape is from Time to Stamp (The Rummage Bin line) and the sentiments come from the new Mona Lisa Moments Classic Essential Expressions set. For my inks I used the Burnt Umber Palette Ink by Stewart Superior and the Brushed Corduroy Distress Ink from Ranger.

To finish it all off…I just had to add in a few of my favorite things…a little freestyle stitching with brown thread, some darling little buttons from My Mind’s Eye and a small white hydrangea flower from Prima Marketing.

Sending out some warm wishes today to you, my friends! :) Have a wonderful day!

8 responses so far

Feb 26 2008

I’m ready for Spring!

Published by Julia Stainton under Card Designs

I’m ready for spring! How about you?! I’m also ready for a new computer! Mine is giving me fits again and I’m about ready to pull my hair out. My son managed to patch up the old one for me so that I can get on the web but all my e-mails and file are on the one that won’t boot today. So frustrating! I’ m glad I had uploaded a few cards to my blog last night so that I have one to share with you this morning. I’ve been incredibly busy getting lots of designs worked up!

Edited to add…many of you have been looking for this stamp set. Right now it is available only at Archiver’s but it will be released to the rest of the retail market shortly. I do know that Lindsey from Jacksonbelle Embellishments has it on order and it will be arriving shortly. Hope this helps!

Flourished Bird

jks-flourished-bird.jpg

This design I actually started a couple weeks ago and just had time to finish it up on the weekend. I’m loving this Inkadinkado stamp set my friend Lindsey picked up for me. I’m also having a lot of fun with this gorgeous Basic Grey Two Scoops patterned paper. I’m sure you know by now that stamping right onto patterned paper is one of my favorite things. I didn’t even have to color…just simple stamping and some embellishments to create this design. The Thinking of You sentiment comes from a beautiful new stamp set by Cornish Heritage Farms…Classic Essential Expressions.

The bird image for this stamp has little dots of berries or buds…not quite sure which. I think it is flexible enough to go either way! Over the dots I adhered these darling little pearl stickers from Ellen Hutson’s store. I love their soft shine in the light. I also added a Making Memories grommet (love these super huge eyelets) and tied a Creative Impressions’ dotted ribbon through it for accent. Also by Creative Impressions…my favorite brads at the moment…the dark antique copper brad. Actually I just used up my last one on a card last night and feel another shopping trip coming on!

Have a great day!

23 responses so far

Feb 25 2008

No Will Power…

Published by Julia Stainton under Card Designs, Challenges

Well I must say…I wasn’t going to make another card for today’s blog. I really should be working on some assignments and upcoming project releases but….. today’s SCS challenge was like waving a red flag in front of a bull. ;) Today’s challenge was to mix up patterned papers and patterns. Well…you KNOW I couldn’t resist that one. How could I? I adore mixing up patterned paper. And so I ran upstairs to my stamping desk to get started. :)

So Sweet

jks-so-sweet-birthday.jpg

I knew right away the perfect layout for this challenge. Well…may not the only perfect layout but one I’ve been wanting to play with for weeks now and haven’t had the change. This sketch layout is from Di Hickman’s challenge here. And of course…it’s never too late for a good sketch challenge, right? I paired up the layout with a bunch of darling papers I’ve had out lately. This sketch is perfect for using up those scraps and with 6 different papers on one little card, it still works! So bright and fun, it pops paired up with black!

jks-so-sweet-birthday-close.jpgTo add a little stamping to my design, I stamped the cake stamp from Gina K’s latest Stamps for a Cause set…How Sweet it Is. Part of the proceeds from sales of this set go to the Diabetes Foundation and it is such a super sweet set! You can check out the details here. The cake stamp was colored in with my Copic markers and then cut out and adhered to a Maya Road Office Sheers journaling box. I’m loving these scrappy accents! So fun and funky! I embellished the top of the candle with a Dew Drop and the flower with a rhinestone sticker. The sentiment wouldn’t quite fit on one of the bottom squares so I shortened it up a little to just so sweet. :) To finish it off, I slipped a Prima flower behind my sheer box and added a touch of Ranger Glossy Accents to my cake to make that icing look super yummy!

Quick Tip: Ranger Pitch Black Adirondack ink is one of the best inks for stamping when working with Copic markers. I love how you don’t have to heat set it and it doesn’t bleed when you use the Copic Colorless Blender pen.

Hope your day is super sweet!

Supply List:

Cardstock: Black - Stampin Up

Patterned Paper: My Mind’s Eye, Autumn Leaves

Stamps: How Sweet it Is - Gina K

Ink: Pitch Black Adirondack ink - Ranger

Other: Dew Drops - The Robin’s Nest, flower - Prima Marketing, markers - Copic, rhinestone sticker - Me and My Big Ideas, Liquid Accents - Ranger, sewing machine

20 responses so far

Feb 25 2008

Precious Baby…

I love making baby cards. I guess I just love babies and everything to do with them! I didn’t design this card for anyone in particular…just because I had this patterned paper and “darling” title card. I just looked baby girl to me and so I added in the “precious baby” part of the sentiment with a Crate Paper rub-on transfer.

Darling Precious Baby

jks-darling-precious-baby.jpg

This was a super simple card design to create. A simple white card base covered with patterned paper and a scalloped edge on the right hand side. I used the EK Success large corner rounder punch to create these large scallops. EK Success carries at least three different sizes of corner rounders in their punch line. I love making different sized scallops with them.

To add a little embellishment to this simple design, I folded a Prima Martini flower over the top of the title block and adhered a jumbo copper eyelet from We R Memory Keepers with my Crop-a-dile. Also with my Crop-a-dile, I added little white eyelets in each of the scallops. The last two additions just make me think “girl”. Soft pink velvet ribbon and a little pink rhinestone sticker to dot the i in darling. :) This design was created for a review for Craft Critique on My Mind’s Eye paper line.

Thanks for stopping by today! Wishing you a fabulous week!

11 responses so far

Feb 24 2008

Terrifically Tacky Tape{C’est Bon}

jks-tape-roll-large.jpgjks-tape-sheets.jpg

Just a quick {C’est Bon} entry from me today. This renovation is certainly taking its toll this week! Today I’d like to give a huge thumbs up to one of my favorite adhesives, Terrifically Tacky Tape by Provocraft. This adhesive is not for your usual adhesion of paper layers etc. but is fabulous for adding some special effects. Super, and I DO mean SUPER adhesive allows you to adhere almost anything to your project. If you have something hard to adhere…this is the perfect adhesive. The Terrifically Tacky Tape comes in sheets 6.75″ x 9″in size and has two sheets per package. Also, this super adhesive comes in a roll of narrow tape that is perfect for adhering difficult altered projects as well as creating borders of embellishments. The tape rolls come in a variety of sizes to meet your particular needs… 1/8″, 1/4″, 1/2″, 1 1/16″

What to do with it…

  • adhere over layer, cover with clear microbeads
  • adhere heavy metal embellishments
  • die cut shapes and apply small loose embellishments over top
  • punch it
  • apply beads
  • apply flocking
  • adhere cardstock to altered project
  • adhere glitter
  • the strip adhesive is perfect for holding together journals and wrapped candles as well as other projects

How to apply…

  1. Cut, punch or die-cut to desired size or shape.
  2. Remove one side of protective backing. Apply to surface.
  3. Remove other side of protective backing. Apply item to be adhered.

Things to Note:

  • Make sure you are totally committed to where you want this adhesive…when it is adhered, there is no going back
  • If you are nervous about applying your adhesive staight…just turn down a tiny corner of the backing to adhere one corner, then slowly peel off the backing applying the adhesive in a smooth manner.
  • I love using my Guillotine paper cutter with this adhesive sheet. It always gives a great clean cut

This product is available at your local craft store, local stamp or scrapbooking store as well as some on-line stores. This product doesn’t look very glamorous on the shelves but if you try it…you’ll be amazed at the fun techniques and looks you can get with it.

Beaded Birthday (click to enlarge photos)

jks-beaded-birthday-2.jpg

I created this birthday design for a good friend of mine whose birthday is this week. I tried to use products and a style that I hope she likes. :) This patterned paper made me think of her when I saw it.

jks-beaded-birhtday-closeup.jpgTo create this design I started off by stamping my image panel using the Silhouette Blooms 2 stamp set and the Time to Stamp set from Cornish Heritage Farms. After stamping and sponging the edges, I cut a piece of Terrifically Tacky Tape sheet the same size as my image panel and adhered it over top. I then sprinkled the entire surface with my clear Microbeads and pressed them in firmly to get a nice smooth even coverage.

To add to my distressed look of this card, I added some brown zigzag stitching and lots of sponging. I decided to try out another new idea I had by added a brushed on “frame” of Ranger Distress Crackle paint. I love how it slowly cracked as it dried adding to the shabby vintage look.

Supply List:

Stamps:Silhouette Blooms 2 (flower), Time to Stamp (ornamental circle), The Art of Framing (birthday sentiment) - Cornish Heritage Farms

Cardstock: Natural Smooth, Tawny Medium - Prism

Patterned Paper:

Ink: Antique Linen & Brushed Corduroy Distress Ink - Ranger, Burnt Umber Palette Ink - Stewart Superior, markers

Other: sewing machine, ribbon & Brads - Creative Impressions, glitter chipboard and pin - Making Memories, Terrifically Tacky Tape sheet, Clear Microbeads - Provocraft, Antique Linen Distress Crackle Paint - Ranger

Hope you enjoyed this product review and tutorial. :) For other {C’est Bon} products just click on the C’est Bon tab in my category section of the sidebar. All {C’est Bon} products are ones I love to use and are my own opinion based on my experience with that product. I love hearing from you. If you have any questions or comments on this product I’ll do my best to answer by editing this post.

11 responses so far

Feb 23 2008

Simply Saturday…simply thinking of you

Published by Julia Stainton under Card Designs

Well I don’t think stamping gets more simple than this! I created this card weeks ago but totally forgot about posting it until now. When I saw this fuzzy flocked metallic paper by Heidi Grace at my local scrapbook store, I couldn’t resist it. Soooo beautiful and I knew right away that I would pair it up with this stamp I already had at home. A little different in style but definitely the same type of flower.

Simply Thinking of You

jks-dreamy-thi-nking-of-you.jpg

To create this design, I simply inked my Penny Black stamp with Tempting Turquoise & Always Artichoke markers and then stamped a first and second impression of the image. The sentiment is from the Lizzie Anne Designs Simply Sentiments set. The image panel edge was simply sponged with Close to Cocoa ink and then adhered and stitched to my card base. To finish it off, I tied a scrap of ribbon around the base of my K & Company embroidered brad and adhered it to the design.

I hope your weekend it simply wonderful! Thanks for stopping by!

13 responses so far

Next »