….is SO much fun…..
![]()
Not!
“wook Mom…bue hair!”
Trust me…this is not as easy to get out as it looks!!!

45 minutes later and 3 bathtub fulls of water…we are all good. 🙂
![]() …. Is it nap-time yet?
…. Is it nap-time yet?

….is SO much fun…..
![]()
Not!
“wook Mom…bue hair!”
Trust me…this is not as easy to get out as it looks!!!
45 minutes later and 3 bathtub fulls of water…we are all good. 🙂
![]() …. Is it nap-time yet?
…. Is it nap-time yet?
Posted in Blog Misc
OK OK, perhaps a stapler is NOT a papercrafting “staple” but they are fun and work so well with trendy, office and shabby styles that I couldn’t resist using them for today’s Ways to Use It Challenge. Staples are great for office, shabby and lots of other styles too. You can use them to staple on ribbon and embellishments or just accent a section of the design. Transparencies are also great stapled on. I don’t have one but the Fastenator is a cool bar type stapler tool that some of you may wish to use. I can’t wait to see what you all come up with for this challenge. Last weeks paint ideas were fabulous! So pull out your stapler and join us at WT151 for a little papercrafting fun!
Survey says…Also of note on Splitcoaststampers… if you use their galleries and forums…be sure to take the time this week to fill out the survey! SCS is wanting to know what YOU think, what you love and what could be improved. Your opinion matters! Check it out at the 2008 Splitcoaststampers Member Survery
Hello Dear Friend
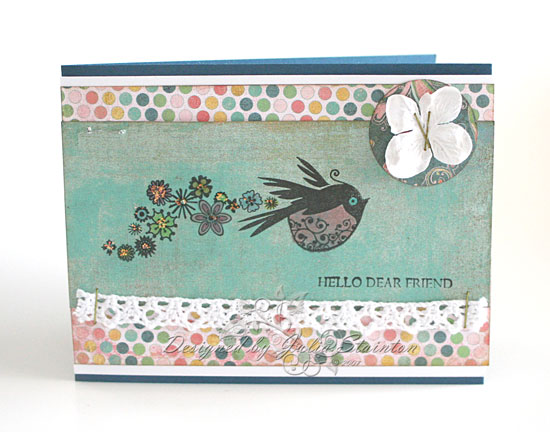
This darling little bird stamp is part of an Inkadinkado stamp set. The whole set is so trendy and just adorable…love it. My good friend Lindsey picked it up for me in Utah. She now has this set on order and I just know it will be super popular. I paired it up with some simple stamping and a fun mix of patterned papers. These papers are from the new Basic Grey Two Scoops 6×6 paper pad. To add color to my “flower trail” I colored them in with my Copic Markers and glitzed it up with some clear Stickles.
My sentiment is from the new Classic Essential Expressions from Cornish Heritage Farms. This set will be released on Friday. 🙂 To add in some staples…I stapled on the Melissa Frances Vintage Trim and Prima Flower. It doesn’t show up too well in the photo but on the top left corner of the image panel, I decided to see how it would look if I stapled from the reverse side.
Have a great day and hope to see you having some stapling fun!
Supply List:
cardstock: Not Quite Navy – Stampin Up
Patterned Paper: Two Scoops 6×6 paper pad – Basic Grey
Stamps: Inkadinkado
Ink: Black Palette Hybrid – Stewart Superior, Antique Linen Distress Ink – Ranger
Other: stapler, circle punch – EK Success, vintage trim – Melissa Frances, Stickles – Ranger, markers – Copic, flower – Prima
Posted in Card Designs, Challenges
This design was a really quick one using patterned paper…stamped on of course! I’m loving that look these days. This particular layout came from this week’s CPS sketch and I played around with it a little to create my own version. The original sketch doesn’t call for a center opening card but I thought that scalloped line would be a perfect place to split the design and use a different fold for a change. It’s just like barn doors. When folding your cardstock, instead of folding in half…fold your outer edges to the middle. I attached a little piece of Natural cardstock that I scalloped the edge on to hide the seam. 🙂
Flourished Friend

This design uses stamps from the new Rummage Bin line from Cornish Heritage Farms. Also new and to be released later this week, a wonderful new sentiments set by Lisa Strahl. I LOVE it and it is going to be my reach for set on almost every design. If you’d like to try out this sketch layout you can check it out at CPS49. 🙂
Supply List:
cardstock: Natural Smooth – Prism
Patterned Paper: Tres Jolie and Confetti lines – My Mind’s Eye
Stamps: Beautiful & Time to Stamp from The Rummage Bin line, Classic Essential Expressions – Cornish Heritage Farms
Ink: Burnt Umber – Stewart Superior
Other: eyelets – Making Memories, chipboard – Basic Grey?, brown corduroy brad – Imaginesce, Large corner Rounder (scallops) – EK Success, flower – Prima Marketing
Posted in Card Designs, Cornish Heritage Farms
Well…I’m feeling really out on a limb with this design. It was so much fun to create but I really stepped out of my box…OK OK I’m mixing my metaphors! You get the drift. You’re either going to like this card or hate it. LOL It’s taken me almost a week to get up the guts to post it. But I am…part of the thought behind my word for this year {embrace} was to try out new things. It’s fun!
Messy Hello
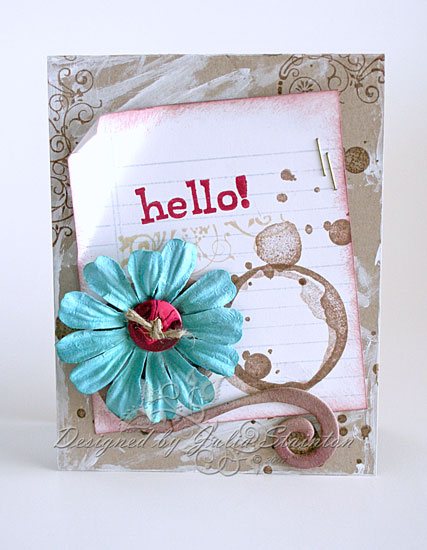
A really shabby funky painted look here that I’ve seen in some scrapbooking layouts. It seemed to go well with the new Ledger Me stamp set from the Rummage Bin line by Cornish Heritage farms. I LOVE the coffee ring and splatter stamps.
Have a fabulous day and stop back in tomorrow for the Ways to Use it Challenge. It’s an easy one for all to play. 🙂
Stamps:
-sentiment and coffee stains from Ledger Me stamp set (The Rummage Bin) by Cornish Heritage Farms
– flourishes from Beautiful stamp set (The Rummage Bin) by Cornish Heritage Farms
-Lined Paper Backgrounder by Cornish Heritage Farms
Ink:
-Burnt Umber Palette Hybrid by Stewart Superior
– Watermelon & Cloudy Blue Adirondack Dye inks by Ranger
Cardstock:
-Prismatic White cardstock by Prism Papers
-Kraft cardstock – Prism
Tools:
-stapler
Accessories:
-button by Autumn Leaves
-flower by Prima Marketing
-flourish chipboard by Maya Road
Posted in Card Designs, Cornish Heritage Farms
Follow your dreams…a wonderful sentiment. We all have dreams, especially young women. I designed this frame for a romantic but up to date look as a gift for my daughter. She is a very patient girl. 🙂 I created this in August and she’s still waiting for it. I know it will be arriving any day now as this design is published in the soon to be released in the new Paper Crafting with Photos special publication from Paper Crafts magazine. I just can’t wait to get a peek inside. I for one, do not use my photos enough! This magazine is to be released on February the 5th and is available to preorder from Paper Crafts magazine.
Follow Your Dreams
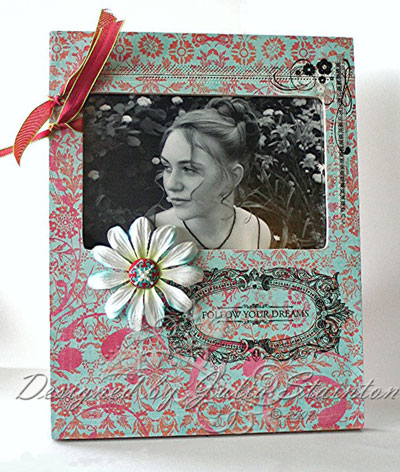
Wishing you a beautiful day and don’t forget to…… follow your dreams!
Posted in Papercraft projects, published designs
I’d never seen these Dahlia fold blooms before and as it was today’s technique challenge I just had to give it a whirl. Rummaging through my paper stash I found this beautiful My Mind’s Eye paper that I hadn’t used yet and thought it would be fun to do a vintage style design pairing it up with some new Rummage Bin stamps. These stamps are from the Beautiful & Art of Framing stamp sets and were fun to work with. For details on how to create the dahlia fold bloom…make sure you check out TLC153 , tutorial here.
Live Laugh Love
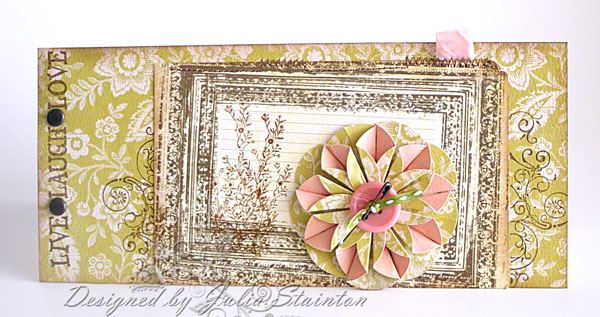
I’ve had this beautiful journaling card by Fancy Pants Designs on my desk for a few days just waiting for a project. I trimmed it down a little and used a 4×9″ card format to still have room to show the patterned paper. After sponging the edges and stamping it…I planned where it would be adhered to my paper and then stamped some flourishes to embellish the paper surrounding it.
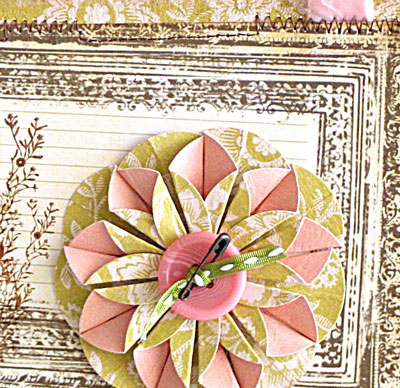 After creating the blossom as per the instructions…I have a tip for you. A double-sided patterned paper is perfect for this technique but I would probably use the lightest weight you can find. It is difficult to fold the heavier paper. To embellish the sentiment…a couple Creative Impressions brads draw your attention to it on the far side. Under my stitching at the top of the card, a scrap of crushed velvet ribbon by Making Memories and in the center of the flower…a My Mind’s Eye button tied with stitched ribbon and a little Creative Impressions safety pin.
Make sure you live, laugh & love today!
Posted in Card Designs, Challenges, Cornish Heritage Farms
I decided to take a little time out last week to ink up some of my new stamps. This design used some great striped patterned paper that was on my desk and the new Silhouette Blooms 2 stamp set illustrated by Kim Hughes from Cornish Heritage Farms. I’d also been wanting to take some time to try out last weeks CPS48 sketch…a very simple design and give it a little twist. Instead of layering up…I layered down…punching out the panel to get a little peek at these pretty spring tulips.
Spring Thanks
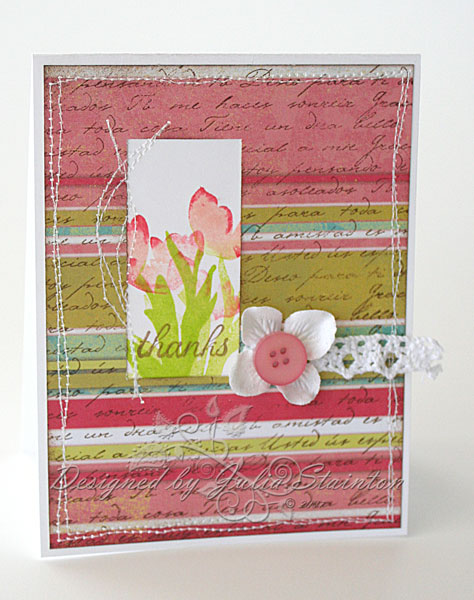
It may be hard to see in this photo but is very evident IRL…to create the rectangular panel for htis layout, I punched out the rectangle from my patterned paper layer and stamped underneath on a white cardstock piece. It really gives the effect of a little peek at the flowers..a window if you will.
Quick Tip: When starting a layout using a sketch diagram…I try to look at it from a few different angles to see if something unique will pop out at me. Sketches can be altered to fit a square card format, turned on their side, upside-down or as in this case, layered down instead of up. I try not to look at the samples until after I’m done my challenge…I want to find my own inspiration first.
I also wanted to do something a little different for the patterned paper as well. While patterned paper is beautiful on its own…there are times when I like to have a little fun with it. For this panel, I stamped it with Burnt Umber ink and my favorite Spanish Script Backgrounder.
To make it easy to line up my stamping underneath…I just slid in a a small white cardstock panel with my stamping on it and adhered to the card base. A little freestyle stitching around the edges adds some interest and to create the leaf effect from the original sketch…did a little stitching up the left side of the window. When stamping my tulips with the ink, I used three different ink pads… Citrus Green, Salmon and Watermelon Adirondack inks. After totally inking the flower blossoms with the Salmon, I simply swiped the tips of the tulips with my Watermelon pad to get a two-toned look.
For my embellishments…a little strip of vintage trim by Melissa Frances (also known as Heart and Home), a Prima Flower and a little button.
Hope your week is off to a wonderful start! Take care my friends!
Posted in Card Designs, Challenges, Cornish Heritage Farms