Monthly Archives: December 2007

Seventeen Candles…

We’re past sixteen candles here and onto seventeen. My oldest son, James turned 17 yesterday. Where HAS the time gone?! I remember it so clearly it seems like yesterday. As for me…I don’t FEEL seventeen years older since then! But wow…he certainly has grown-up. We celebrated James birthday yesterday, as always, amid the busy holiday preparations and the elementary school Christmas Concert. As an aside to that…whatever happened to singing traditional Christmas songs at the Christmas Concert?! It just isn’t the same anymore. So anyway…amidst my busy day yesterday, I whipped up this little card and wrapping for him for one of his gifts. 🙂

Celebrate Seventeen

jks-celebrate-seventeen-car.jpg

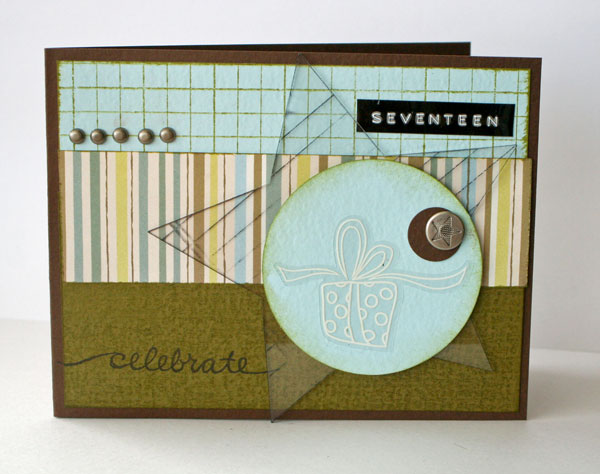
For this design, I actually got the idea from some striped paper I have. I had this little book to wrap up for him and for some strange reason, it popped into my head that I could use some of my older thin patterned paper to wrap it up. So fun! I trimmed off 2 inches from the length and width to make it 10×10 size so that I could work the trimmings into a coordinating card design. 🙂 More about the wrapping later. 🙂 I pulled the color combo from the striped paper. I believe it may have been from a Rob and Bob Studio Slab pack from Michael’s a few seasons ago. I pulled out my Prism cardstock swatch book and matched up my cardstock. I love Olive and aqua colors together and the change for that red and blue boy card is so welcome!

To create my design, I decided to use panels of color on a dark brown cardstock base. The design actually works three Cornish Heritage Farms backgrounders into it. I’m having so much fun with them and the texture and interest they provide. Instant patterned paper in exactly the colors you want. For the top panel, I stamped the Grid Paper stamp in Old Olive ink and then inked the edges with it. My bottom panel is overstamped with the Burlap backgrounder. Hard to see in the pic but the texture looks fabulous in person. I stamped the word celebrate from Kim’s Scripty Words set in my Black Palette Hybrid ink. The tails are quite long and didn’t fit into my space so I just inked up the very middle of the stamp to make it work.

Next I was on to working on the circular part of the design. The circle was punched with my Marvy Mega circle punch and the edges sponged with more Old Olive. For the present, I decided to use this little clear present sticker from Heidi Swapp designs. It is from the Silhouette Images – Bridal White sticker sheet. It was fun taking the presents off a Wedding themed product and using it on a birthday design instead. I added this fun Making Memories Mesh Star Brad, set with my Crop-a-dile.

The design still needed something! I then remember these fun Clear Scraps Stars I had picked up a few weeks ago. I think I’ll be heading back for more! So cool! I stamped Lined Paper on my star with Black Stazon and inked up the edges to get a more urban look. To tie in the black and personalize it a bit more, I added “seventeen” with my Dymo Label Maker on the grid paper. I’m quite pleased with the look now!

jks-celebrate-seventeen-copy.jpg

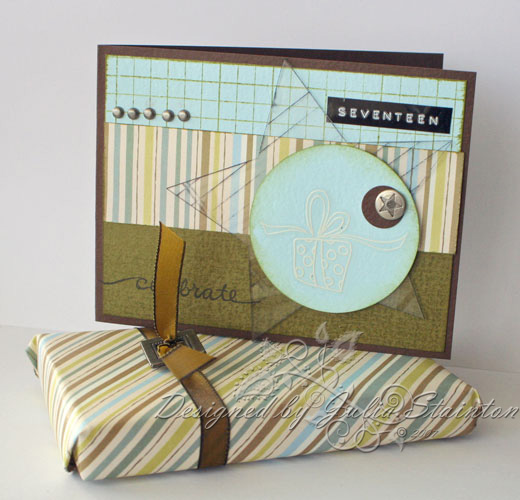
As for the wrapping, I had never seen a present wrapped on the diagonal until last week. One of the toy shops here offered free Christmas wrapping and I took them up on it. The lady wrapped one of the gifts on the diagonal and it was kind of neat. I just had to try it here. I need to work on those corners a little but I don’t think anyone will care…especially not a 17yo! I tied up the package with some of my May Arts ribbon and tied on a little buckle from the We R Memory Keepers hardware set….just to make it a little special. 🙂

Hoping your day is special! Have a good one!

Holiday Frame

I love making altered frames! So much fun to do! This frame is a 12×12 frame and is perfect for using 12×12 patterned paper with. I created this frame to hang in my living room this Christmas season to hold a photo of my children this year. I love this picture. Do you know how hard it is to get five kids of varying ages to get close together and all smile at the same time?! I had to give them all credit for their patience. And each year…this is one of my favorite gifts….the gift of them to quickly and the memories a photo holds is something to treasure.

A Merry Little Christmas Frame

jks-frame-finished.jpg

This frame uses Cosmo Cricket Be Good paper line and their fun Buck Naked Chipboard Ornaments. I love their products. I created this frame for a Craft Critique article a few weeks ago. You may have already seen it there. It is actually part of a tutorial article and if you want the instructions…check it out at…

A Merry Little Christmas Frame

You may want to check out Craft Critique today… lots of awesome blog links and starting tomorrow…our biggest carnival ever….three days of links to great Holiday projects. 🙂

How’s your countdown to Christmas going? I finally have my tree up…not quite decorated but it is up. 🙂 The living room is decorated and the Christmas cards mostly out. Presents all bought and wrapped. Wow…it has been a busy year!

We Wish You a Merry Christmas…a little elfing fun

We wish you a merry Christmas. We wish you a Merry Christmas. We wish you a Merry Christmas and a Happy New Year! I’m in the middle of our second MAJOR snowstorm of the season. I’ve heard it is supposed to be a wild winter. I can’t go anywhere but I’m having fun getting some more things crossed off my list.

A friend first sent me a darling link to this elfing site a few weeks ago. She had put a few faces together from a design team and it was so much fun. I giggled and giggled and giggled! I knew I just had to try it out for myself and so Saturday…I finally took a little time (I know I have a million other things to do!) to have a little fun. Four spaces worked perfectly for me to add a few more elves to Santa’s mix. Check it out. 😉 Just a little holiday fun from Lindsey, Michele, Trudee and myself…

Elf Yourself

Have a great day! Only just over a week until Christmas! Are you all ready for it or are you like me…lots more to do!:)

Fancy Pants Fashion Sense Pins {C’est Bon}

fancy-pants-pins.jpg

I think these must be among my top favorite embellishments that I have discovered in the past few months! I just adore these little pins! So fun and easy to work with…they make a great addition to most projects. I love their fresh look! The new Fashion Sense Pins from Fancy Pants Designs are so darling…I just want to have them all. Each package comes with 32 pins. There are 6 different selections available and in each one…4 pin-head designs and 4 different colors. The Sassy, Playhouse, Harvest and Splash pins have color combos to span the seasons. Tis the Season and With Love Pins are more seasonal in nature and have darling little shapes and colors to their packages.

How to Use

If you’ve never added pins to your designs, they are very easy to use. The pins can be held with ribbon, buttons, slid into chipboard or through felt, and are a great embellishment to work in with other types of embellishments. A cluster if you will. These pins sell for around $5.99 US and I know if you buy one package, you’ll definitely be back for more.
Where to Find

  • I purchased my pins at my local scrapbook store… The Scrapbook Studio. I love their great selection.
  • You can also purchase these Fancy Pants Fashion Sense pins on-line at various retailers

Holiday Wishes, Loving Kisses
jks-holiday-wishes-loving-kisses.jpg

I started off this design by wanting to try out a new stamp set from Kitchen Sink Stamps. I love this darling Three-step Mistletoe. What a great, flexible Christmas set and it has darling sentiments to go along with it too! The Purely Pomegrant, Bashful Blue and Old Olive color combo is pulled from this darling Striped Christmas paper from Webster’s Pages. I just love it!

After stamping my three-step mistletoe with …you guessed it…three layers of stamping, 😉 I added a little knotted piece of May Arts ribbon. I find it easiest to add the pin by first knotting the ribbon how you want it and then sliding the pin through. To add a fun touch to the pin, I added a little rhinestone sticker embellishments.

Quick Tip:  Have fun embellishing your embellishments for a fun, unique touch. Embellishments can be sanded, painted, inked or have stickers or rhinestones added to make them that extra bit special

To add a couple extra touches, I stitched around my layers with brown thread and then added one super huge copper brad from Karen Foster Designs.

Wishing you holiday wishes and may you get lots of kisses! 😉

Some other designs… (click on image to go to original post instructions)

jks-thanks-for-all-you-do-2.jpgjks-wanted.jpgjks-a-precious-gift-2.jpgjks-sunny-days-resized.jpgjks-thanksgiving-cornocopia.jpgjks-heart-to-heart-closeup.jpg

Simply Saturday…flocked trees

It’s Saturday…another busy Saturday as Christmas draws nearer! Only ten more shopping days to go! 😉 I’m busy trying to finally get up our Christmas tree today so this entry will be super short. I just know you have things to do as well!

Christmas Peace

jks-christmas-peace-resized.jpg

This is a super clean and simple design using this darling little Christmas tree set, Playful Christmas from Kitchen Sink Stamps. I just love the two step stamping and had to try it out with a little flocking. The trees were first stamped with the solid image in Soft Sky and Olive Olive. Using my Essential Glue Pad, I inked up the funky circles tree and stamped it right on top. Using blue flocking, I sprinkled both trees and then tapped off the excess. I love how the flocking changes the colors underneath a little and the flocking looks so funky with those retro trees. I just love this Figgy Pudding 6×6 pad of paper from Basic Grey. What great fun color combos and patterns, sized perfectly for designing cards. A mat of metallic red cardstock and Soft Sky borders my image and for a sparkly touch…some big fat clean rhinestones from Doodlebug Designs adds a festive touch to the top of the trees!

Hope your Saturday is simply wonderful!

Making a List…

Making a list…checking it twice…

I’ve been busy making lists, lists, lists…to do lists, to buy lists, food lists, when-on-earth I’m going to do it all lists! This year Christmas has really crept up on me and I am scrambling. The tree has yet to go up…that is Saturday’s project. While I’ve been busy making all these other lists though…I’ve written a Christmas Wish List article for Craft Critique. A list of things I’m wishing for this Christmas and a list of things I love in case you need a little help with finishing off your Christmas list. 🙂 What did I wish for? Well….check it out….

Dear Santa…a papercrafter’s list

What’s on your list this year? I’d love to know!

Enjoy the rest of your countdown to Christmas and remember…it’s really not about the gifts…it’s about the joy, hope, love and peace that God’s gift to us has brought. 🙂

Winter Wonderland …a monochromatic design

I love monochromatic color schemes and really, I just don’t use them enough. Soft, elegant and beautiful…monochromatic designs are all about design and texture and the beauty of the image themselves. It’s Thursday again and time for another Ways to Use it Challenge! This week the challenge is to find ways to use a monochromatic color scheme. 🙂 If you’d like to play along…all are welcome! Check out the challenge at WT144

White Christmas

out-for-pub-sign-oct-07.jpg


For this design, I actually limited myself to only white cardstock, Sahara Sand ink and a touch of soft yellow Copic markers to highlight the glow from the windows. When using only one color of cardstock and ink, you need to rely heavily on the element of texture to keep your design from looking flat. After stamping my Thomas Kinkade Stonehearth Hutch image from Cornish Heritage Farms onto my main image panel, I sponged the edges of my white cardstock with Sahara Sand ink. This helps define my layers. The sentiment, Have Yourself a Merry Little Christmas, also from the Thomas Kinkade line was stamped directly on top of the image. On top of my main card base, the Textured Harlequin backgrounder was stamped on a slightly smaller white cardstock panel and again, my edges were sponged. After adhering my layers together, I straight-stitched around my main image and around the background panel, used a free-style stitch. The edges of my image were pulled up with my finger to add some more texture.

My finishing touches…some Basic Grey chipboard holly leaves were sponged with white craft and then the edges sponged with Sahara Sand. Three Making Memories rhinestone stickers form some glittering holly berries and keep with the monochromatic scheme.

Hope you enjoy this design. I’m hoping for a white Christmas here! It just doesn’t seem like Christmas without a little snow!