Archive for December, 2007

Dec 31 2007

A little Spring?

I had a little fun putting this card design together. It is a little different and I took a few risks with it. A fresh color combo and some vintage/shabby touches and some quick messy watercoloring…well…I love it but I’m not sure how you all are going to like it! :) DH hates it! LOL “You MADE that?!” ;) Soooo be honest…what do you think? I’m a big girl…I can take it. :) I think last yesterday I was just tired of perfect coloring and perfect squares and perfect scallops and wanted to think outside the box. I even colored that wild rose in blue! One of my resolutions this year is to try out new things and be more creative. I hope it is one I can keep!

Shabby Hello

out-for-pub-sign-oct-07.jpg

This design is currently out for publication…


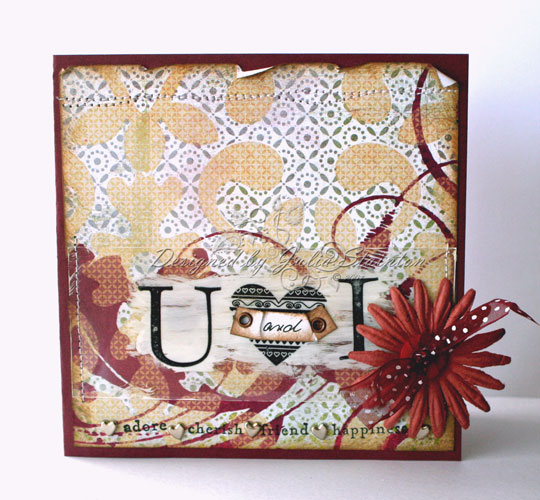
I actually started this design while cleaning up my desk. I couldn’t throw away this darling little scrap of Hambly Screen Prints transparency. So I paired up that acid green with some turquoise and blue and had a little shabby fun. For the background…I used the Spanish Script backgrounder from Cornish Heritage Farms. I inked it up randomly…leaving the edges uninked for a interesting look. After watercoloring my Wild Rose stamp with Chocolate Chip, Certainly Celery and Cool Caribbean, I ripped out the image and crumpled up the edges.

To hold down that Hambly transparency I added some brown stitching to the left side and secured the right with some Spumoni Prima Flowers. To add a quick sentiment, I tucked in a little Hello…from the Silhouette Blooms stamp set and added some more random stitching. A few Autumn Leaves buttons decorate the top left corner to finish it off.

I also want to take this time to wish you all a safe and happy new year! If you want to kick the new year off with some new stamps and goodies…I thought I’d let you know… Cornish Heritage Farms is having a one day sale tomorrow. You might want to check it out! :)

Supply List:

Cardstock: Frosted Teal, Birchtone Dark, Natural Ivory - Prism

Stamps: Wild Rose, Spanish Script, Silhouette Blooms - Cornish Heritage Farms

Ink: Chocolate Chip, Certainly Celery, Cool Caribbean - SU, Burnt Umber Palette - Stewart Superior

Other: flowers - Prima, sewing machine, buttons - Autumn Leaves, transparency - Hambly Screen Prints, brad - Creative Impressions

24 responses so far

Dec 30 2007

Simply Love…

Well…It’s not Saturday but I’m going to share a very simple design with you today instead. These holidays mixed up with a lot to do have really done a number on my schedule! :) I’m hoping another week of the kids home and then I’ll be able to get back to normal!

This is a super quick Valentine’s Design. I’m really loving simple these days. I love designing a variety of styles and mixing them up to keep things interesting. When you design pretty much daily…this is a good thing. I shared a design with you on Thursday with this same set and it has a totally different look. I still have another one up my sleeve ;) for another day. It is totally different again so stay tuned!

{Heart} U

jks-heart-u.jpg


For this design, I used a simple card of Very Vanilla cardstock and used a Spellbinders Oval Nestability die to emboss the front. This gives a very subtle look with no layers but still gives a sense of boundaries in the design. Inside the embossing, I stamped a simple U and heart from the Heart To Heart stamp set by Lizzie Anne Designs. For the heart…I added a little interest by first inking the stamp in Regal Rose ink and then Rock n Rolling the stamp by rolling the edges with my Rose Red ink pad. I love the dual tones and this is such a great simple technique for solid stamps.

For my super quick embellishments…I just adore these little felt birds from Maya Road…how cute is that?! A little button is tied with some May Arts ribbon and helps anchor the design.

Hope you are having a simply wonderful weekend!

20 responses so far

Dec 28 2007

Smitten…

I’m just smitten with Paper Crafts new February issue! Haven’t gotten my copies yet but I did spy it in the drug store yesterday while I was posting some designs….we have a post office right in the store. Of course I had to flip through. I can’t wait for it to arrive in my mailbox and for some time to actually go through it carefully. LOL I had to stop as I was getting some curious looks from an employee. ;) Some gorgeous designs were catching my eye! I have two designs in this issue and can share one of them with you here.

Words of Love

jks-embossed-love.jpg

This design uses three embossing powders embossed over patterned paper as part of the Hot Hot Heat feature in this issue. You can check it out on page 70, I believe. My other design on is page 51 and is part of the Valentine’s feature. If you don’t subscribe to this magazine…you can purchase it at your local craft store or on-line at Paper Crafts. :)

jks-embossed-love-towards-sun.jpg

23 responses so far

Dec 27 2007

U and I

I always like making Valentine’s Cards that are a little more masculine in nature. After all…my hubby is NOT going to appreciate a lot of pink and flowers …he just wants to know that I love him. :) While playing around with this Heart to Heart stamp set by Lizzie Anne Designs I decided to try out a darker, more vintage look…perhaps a more “scrappy style” if you will. I love the results…some stamping on acetate, a little paint, stitching…I’m hoping he likes it! :)

Today is also Thursday and time for another Ways to Use it Challenge. This week, the challenge is a rerun. With the busy days during the holidays I thought it would be a good time for one and today….the challenge is to use Stazon! :) I love Stazon ink…perfect for so many surfaces. As in this card design, I mostly use mine on acetate but also love using it on glass. Stazon ink is also great for stamping and then watercoloring as it doesn’t bleed. If you’re just starting out…my favorite Stazon inks are Black and White Opaque…soooo flexible. Try them! You’ll love them. If you’d like to play along…make sure you check out the challenge at WT146.

U & I

jks-u-and-i-final.jpg

This design is pretty simple…a 5.25″ square card design layered with the beautiful Perhaps Basic Grey paper. You know how much I love those 6×6 paper pads! :) The U heart I was stamped in black Stazon Ink from Tsukinkeo onto a transparency. I love transparencies…they are fabulous to stamp on and you can brush ink or paint behind them just where it is needed…sort of a layer but one that barely covers up what is beneath. Over the heart…I hand wrote “and” on a little strip of paper and then sponged the edges with Distress Ink. After crumpling the strip…I attached it over the heart with my Crop-a-dile and some eyelets. I then attached the transparency to my design by stitching the edges to the card and also added a little stitching to the top of the card. I decided to have a little fun with the bottom of the design as well…I pulled out my Just Words stamp set and stamped coordinating words along the bottom of the patterned paper. Between each word, to add definition, I added a tiny silver heart brad by Making Memories. A Prima flower, a button and some ribbon finish off the design.

Wishing you a wonderful day! Hope you have time to join us for the challenge! :)

15 responses so far

Dec 26 2007

A New Year’s Design

Published by Julia Stainton under Card Designs, Holiday

I hope you all had a fabulous Christmas yesterday. Was Santa good to you? ;) I had a lovely day spent with my family, aunt and dad. So much to eat and that refrigerator is stocked full with leftovers. Yippee…doesn’t look like I’ll have to do much cooking for a while! :) Today I’m doing some designing and trying to get back to normal here. It’s been so busy I haven’t stamped in a week and so I’m really looking forward to it.

In the meantime, New Years is just around the corner. Now I’ve never actually sent a New Year’s card before…I’ve only designed two actually and so I’m sharing this quick design below. Lots of shimmer and fun. :)

Starry Glitter New Year’s

jks-starry-glitter-new-years.jpg

This design actually uses a Christmas paper that has a starry night with Santa riding on his sleigh. After designing a card with the image, i was left with this scrap of starry black patterned paper and thought it might be fun to try a New Years design with it. I love pairing up black and aqua. This cardstock is actually the retired SU Cool Caribbean cardstock as it matched up my glittery chipboard alphabet so well. This Making Memories chipboard is so sparkly and fun and easy to work with. H N Y for Happy New Year. On the right side of hte design…I used a little acetate Ghost Shape Snowflake by Heidi Swapp and over top… a Happy New Years epoxy embellishment from Around the Block. To finish it off…a couple rhinestone brads by Making Memories.

Hope you are having a great Boxing Day. That’s the day after Christmas…a holiday for most people here in Canada and also in Britain. :) I’m staying home and not braving the stores! If you do feel like doing a little shopping…you might want to pop by Jacksonbelle Embellishments. Lindsey is having a huge sale…most items in the store 25% off until midnight the 28th. Have fun!

6 responses so far

Dec 23 2007

An Indescribable Gift

It is so busy this time of year. So much going on…so many preparations to make…so many gifts to buy. I just had to take the time today to share my favorite Christmas card that I have designed. I actually designed this last year working with a Thankful Theme. You may have seen it before but as it is special to me, I wanted to share it here on my blog. Why is this design special to me? Well, I’m really pleased with how the design and elements on this card all came together, but mostly…it means something to me as it reminds me of the real meaning of Christmas. Remembering God’s Gift to us…his son. This card is designed around a verse…

Thanks….Be to God for his indescribable gift. 2 Corinthians 9:15

The thanks is stamped on the front and the rest of the verse, computer-generate on the inside.

Thanks Be to God

jks_ddgallery_oct_thanks_be_to_god_by_julia_s.jpg

This card also reminds me of one of my favorite Christmas songs… Mary Did you Know by Mark Lowry…

Mary, did you know
That your baby boy will one day walk on water?
Did you know
That your baby boy will save our sons and daughters?
Did you know
That your baby boy has come to make you new?
This child that you’ve delivered
Will soon deliver youMary, did you know
That your baby boy will give sight to a blind man?
Did you know
That your baby boy will calm a storm with His hand?
Did you know
That your baby boy has walked where angels trod?
And when you kiss your little boy
You’ve kissed the face of God

Mary, did you know?
The blind will see
The deaf will hear
And the dead will live again
The lame will leap
The dumb will speak
The praises of the Lamb

Mary, did you know
That your baby boy is Lord of all creation?
Did you know
That your baby boy will one day rules the nations?
Did you know
That your baby boy is heaven’s perfect Lamb?
This sleeping child you’re holding
Is the Great I Am

 
Supply List:
Stamps: heavenly Peace, Paisley, Magenta crackle stamp, Linen, Autumn, EFP
Paper: whisper white
Ink: sahara sand, black
Accessories: on board, chipboard, sewing machine, aquapainter, crop-a-dile, eyelets, mat pack

Wishing you and yours a blessed Christmas!

31 responses so far

Dec 20 2007

It’s a Wrap!

It’s a Wrap! That’s today’s challenge. ;) Couldn’t resist the play on words. It’s Thursday again and I’m once again hosting, hostessing…whatever!…a Way’s To Use It Challenge on www.splitcoaststampers.com So…….get ready to jump in and play along!

Now what do I mean by It’s a Wrap? Well….incorporate your stamping and papercrafting into wrapping up some gifts. Come on…there must be a few of you left who like me, still have a couple left to wrap up. If not…find ways to use that wrapping paper right in a card design. This is a very open challenge! As long as you use some wrapping supplies…it’s all good. It’s doesn’t have to be Christmas either…wrap up a birthday gift…just have some fun with it! Join us at WT145!

Pinkalicious Penguin Package (sorry…couldn’t resist the alliteration!)

jks-penguin-parcel-2.jpg


Now this Christmas gift bag is going to be filled with lots of goodies for my Mother-in-Law. She seems to like everything I make so I’m sure hoping she will enjoy this. This design is actually worked up (very quickly this morning, I might add) combining two challenges. As you already know…for today’s WT challenge and starting last month the Splitcoast Dirty Dozen and Dirty Dozen Alumni (that’s me) are getting together and having a fun little challenge. This is my first month at it. The challenge…use a penguin stamp, no blue and some sparkle. Ok, ok…you have to look very closely on this to find the sparkle. But it’s there…some Crystal Effect and a couple little clear rhinestone stickers…you KNOW how much I love those! And so enough blabbing. I don’t know what’s gotten into me today. I must have kissed the Blarney Stone. I AM half Irish you know! ;)

For this design I used an 8 x 10 Kraft gift bag from Michael’s. I found the hard way that these bags are NOT easy to stamp on so I decided to cover it instead. I couldn’t use blue so I decided to have a little fun pairing up pink, white and kraft for a fun, festive look. I used a piece of Pretty in Pink cardstock and stamped it with Large Snowflakes stamp from Cornish Heritage Farms using white craft ink. Hard to see in the pic I know but really sweet IRL. :) I trimmed down the cardstock a little before adhering it to bag. To finish the top edge, I used a piece of white velvet ribbon and then decided to add a sentiment strip across the bottom of the design. Merry Christmas (Holiday Cheer set) was stamped in Pink Passion ink onto a kraft cardstock strip. The edges were sponged with white craft ink and then stitched on my sewing machine. This gorgeous Queen and Co. Felt Fushion embellishment caught my eye. Sooo darling and it worked perfectly under the sentiment for some definition. These felt cut-outs come is lots of gorgeous colors and now come with adhesive on the back. This is SUCH an improvement! I loved Queen and Co.’s first felt strips but they WERE difficult to use. A little rhinestone sticker from Doodlebug Designs dots the i and some Autumn Leaves button are adhered to the right side of the panel. Have I told you how much I’m lovin’ buttons right now?! ;)

Quick Tip: When using the Queen and Co. new adhesive backed felt strips, peel off the backing slowly and carefully, making sure not to adhere it on itself. The felt can be torn under rough treatment but the look is well worth that minute of slowing down and being careful! :)

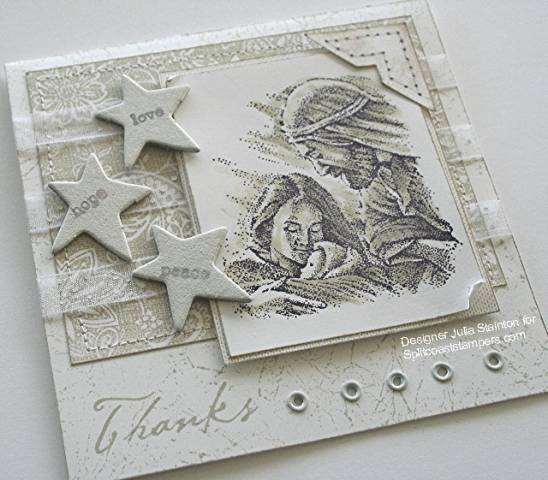
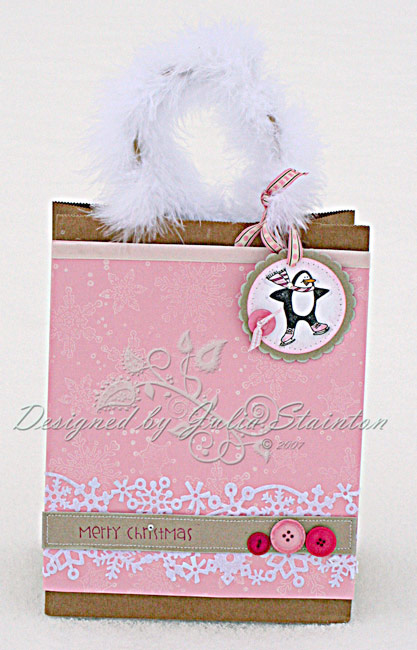
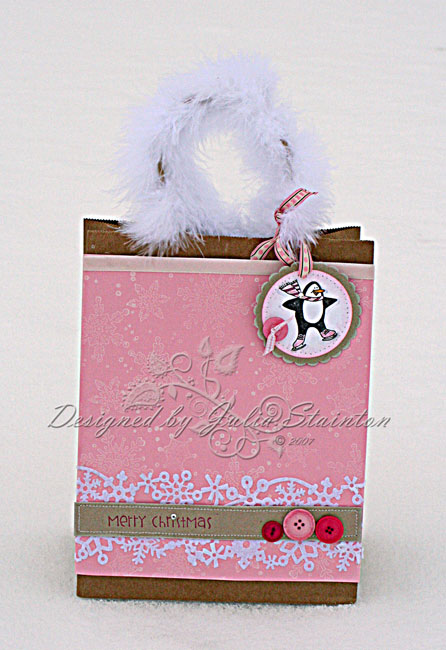
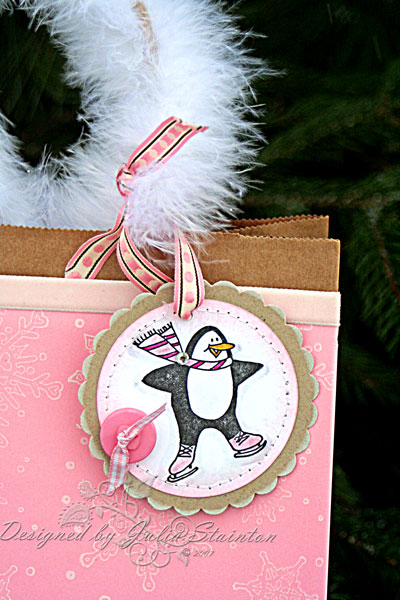
My little tag was so much fun to make. It is the first time I’ve inked up this darling stamp designed by Asela for Cornish Heritage Farms. I stamped it on white cardstock and then punched it out with my Mega circle punch by Marvy. The scalloped circle is the Giga size and is punched out of kraft cardstock and the edges swiped with white craft ink. After coloring my penguin with Copic markers, I sponged the edges with Pretty in Pink ink and then stitched around the circle. To add an “ICY” element, I added some crystal effects under his feet…sorry it is terribly overcast today and you can’t see it. Actually, I had to go OUTSIDE to take these photos. That is REAL snow folks! ;) And real pine and spruce branches too! My neighbours must think I’m crazy but hey…a gal’s gotta do what she’s gotta do! ;)

So……….. I really need to finish off this post! A little ribbon ties the tag on the bag handles and another button is tied with some gingham ribbon and adhered to the tag. The handles…well…they’re my favorite part! I’ve been hoarding this fuzzy stuff for about a year and finally broke down and used it. So fun and fluffy to wrap around the handles. Now I’m not quite sure what you call it…i bought mine at the dollar store! Boa? Maribou? Whatever it is…it’s super fun! Be careful though…fluff everywhere when you cut it. I KNOW! I had the dickens of a time trying to pick it out of my not-quite-dry Crystal Effects ice rink! :)

14 responses so far

Dec 19 2007

Seventeen Candles…

We’re past sixteen candles here and onto seventeen. My oldest son, James turned 17 yesterday. Where HAS the time gone?! I remember it so clearly it seems like yesterday. As for me…I don’t FEEL seventeen years older since then! But wow…he certainly has grown-up. We celebrated James birthday yesterday, as always, amid the busy holiday preparations and the elementary school Christmas Concert. As an aside to that…whatever happened to singing traditional Christmas songs at the Christmas Concert?! It just isn’t the same anymore. So anyway…amidst my busy day yesterday, I whipped up this little card and wrapping for him for one of his gifts. :)

Celebrate Seventeen

jks-celebrate-seventeen-car.jpg

For this design, I actually got the idea from some striped paper I have. I had this little book to wrap up for him and for some strange reason, it popped into my head that I could use some of my older thin patterned paper to wrap it up. So fun! I trimmed off 2 inches from the length and width to make it 10×10 size so that I could work the trimmings into a coordinating card design. :) More about the wrapping later. :) I pulled the color combo from the striped paper. I believe it may have been from a Rob and Bob Studio Slab pack from Michael’s a few seasons ago. I pulled out my Prism cardstock swatch book and matched up my cardstock. I love Olive and aqua colors together and the change for that red and blue boy card is so welcome!

To create my design, I decided to use panels of color on a dark brown cardstock base. The design actually works three Cornish Heritage Farms backgrounders into it. I’m having so much fun with them and the texture and interest they provide. Instant patterned paper in exactly the colors you want. For the top panel, I stamped the Grid Paper stamp in Old Olive ink and then inked the edges with it. My bottom panel is overstamped with the Burlap backgrounder. Hard to see in the pic but the texture looks fabulous in person. I stamped the word celebrate from Kim’s Scripty Words set in my Black Palette Hybrid ink. The tails are quite long and didn’t fit into my space so I just inked up the very middle of the stamp to make it work.

Next I was on to working on the circular part of the design. The circle was punched with my Marvy Mega circle punch and the edges sponged with more Old Olive. For the present, I decided to use this little clear present sticker from Heidi Swapp designs. It is from the Silhouette Images - Bridal White sticker sheet. It was fun taking the presents off a Wedding themed product and using it on a birthday design instead. I added this fun Making Memories Mesh Star Brad, set with my Crop-a-dile.

The design still needed something! I then remember these fun Clear Scraps Stars I had picked up a few weeks ago. I think I’ll be heading back for more! So cool! I stamped Lined Paper on my star with Black Stazon and inked up the edges to get a more urban look. To tie in the black and personalize it a bit more, I added “seventeen” with my Dymo Label Maker on the grid paper. I’m quite pleased with the look now!

jks-celebrate-seventeen-copy.jpg

As for the wrapping, I had never seen a present wrapped on the diagonal until last week. One of the toy shops here offered free Christmas wrapping and I took them up on it. The lady wrapped one of the gifts on the diagonal and it was kind of neat. I just had to try it here. I need to work on those corners a little but I don’t think anyone will care…especially not a 17yo! I tied up the package with some of my May Arts ribbon and tied on a little buckle from the We R Memory Keepers hardware set….just to make it a little special. :)

Hoping your day is special! Have a good one!

18 responses so far

Dec 18 2007

Holiday Frame

I love making altered frames! So much fun to do! This frame is a 12×12 frame and is perfect for using 12×12 patterned paper with. I created this frame to hang in my living room this Christmas season to hold a photo of my children this year. I love this picture. Do you know how hard it is to get five kids of varying ages to get close together and all smile at the same time?! I had to give them all credit for their patience. And each year…this is one of my favorite gifts….the gift of them to quickly and the memories a photo holds is something to treasure.

A Merry Little Christmas Frame

jks-frame-finished.jpg

This frame uses Cosmo Cricket Be Good paper line and their fun Buck Naked Chipboard Ornaments. I love their products. I created this frame for a Craft Critique article a few weeks ago. You may have already seen it there. It is actually part of a tutorial article and if you want the instructions…check it out at…

A Merry Little Christmas Frame

You may want to check out Craft Critique today… lots of awesome blog links and starting tomorrow…our biggest carnival ever….three days of links to great Holiday projects. :)

How’s your countdown to Christmas going? I finally have my tree up…not quite decorated but it is up. :) The living room is decorated and the Christmas cards mostly out. Presents all bought and wrapped. Wow…it has been a busy year!

15 responses so far

Dec 17 2007

We Wish You a Merry Christmas…a little elfing fun

Published by Julia Stainton under Blog Misc

We wish you a merry Christmas. We wish you a Merry Christmas. We wish you a Merry Christmas and a Happy New Year! I’m in the middle of our second MAJOR snowstorm of the season. I’ve heard it is supposed to be a wild winter. I can’t go anywhere but I’m having fun getting some more things crossed off my list.

A friend first sent me a darling link to this elfing site a few weeks ago. She had put a few faces together from a design team and it was so much fun. I giggled and giggled and giggled! I knew I just had to try it out for myself and so Saturday…I finally took a little time (I know I have a million other things to do!) to have a little fun. Four spaces worked perfectly for me to add a few more elves to Santa’s mix. Check it out. ;) Just a little holiday fun from Lindsey, Michele, Trudee and myself…

Elf Yourself

Have a great day! Only just over a week until Christmas! Are you all ready for it or are you like me…lots more to do!:)

6 responses so far

Next »