Archive for October, 2007

Oct 27 2007

Simply Saturday… some more Daisies

Published by Julia Stainton under Card Designs

It’s Saturday again and time for another super simple design. It’s kind of funny as sometimes I love designs with lots of layers and detail but oft times lately, I’ve come to appreciate simple as well. This simple design uses the Daisy Dots stamp set from Lizzie Anne Designs. I had wanted to try out a fresh color combo of Celery, Soft Sky and Kraft and it just seems to lend itself well to a clean design.

Simply Daisy Hello

jks-simple-dasiy-dots.jpg

For this card, I created 5.25″ square card base and layered it with my kraft image panel. I love the look of white craft ink on Kraft…actually I love white craft ink on anything. I wonder why I don’t use it as much as I should! The solid daisy stamp was so quick to stamp on the kraft cardstock and then mat the layer with Whisper White. After tying a length of one of my favorite May Arts ribbons around it, I adhered it to the card front. I thought it might be fun to add the sentiment from the set in one of the daisy centers so I stamped it onto my Soft Sky cardstock, punched it and layered it with Certainly Celery. A little piece of white foam tape popped out the sentiment and made it a little more interesting.

Quick Tip: It is easier to line up a stamp in a punched shape if you first stamp the image, then punch it out by turning your punch upside-down to see where you are punching.

Lastly, two quick little embellishments on this design. A quick row of straight stitching around the perimeter of the design and a little Making Memories clip…isn’t it cute?

Wishing you a SIMPLY fabulous Saturday! Check back in tomorrow for another {C’est Bon} entry. :)

11 responses so far

Oct 26 2007

I’ve been tagged!

Published by Julia Stainton under Blog Misc

LOL I’ve been tagged three times (Lisa Johnson, Lindsey Botkin, Mary Duffek) in the past 24 hours so I guess I need to stop and play along! Fun! Although…I’m not quite sure what I’m going to say! I’m never good at these things! I can never think of anything exciting! But….I’ll try! :)

Here’s the deal…

Instructions:
1. Link to the person that tagged you and post the rules on your blog.
2. Share 7 random and/or weird facts about yourself (on your blog, we all want to know them).
3. Tag 7 random people at the end of your post and include links to their blogs.
4. Let each person know that they’ve been tagged by leaving a comment on their blog.

Random things about me… (try not to fall asleep ;)

1. I love to read. Books, books and more books! I’ve had to really cut back though to focus on my stamping. I used to read minimum one book a week.

2. I like being organized but alas…I fail miserably.

3. Unless under a deadline, I usually design two projects a day. I have a small corner of the family that is always overflowing with paper and goodies.

4. I love wearing skirts and do so almost every day. I have about 4x as many skirts as I do pairs of pants.

5. My favorite subjects in High School were Art, Math and Drafting.

6. I love chocolate. Favorite Dessert:Chocolate Cheesecake, Favorite Ice Cream: Chocolate Mousse Royale from Baskin Robbins, Favorite Chocolate Bar: Cadbury’s Flake (from Britain)

7. I’m a morning person. I like to get up early and my most productive time is in the morning.

I’m tagging these talented people… I’ve tried to find bloggers who haven’t already been tagged. If you haven’t been tagged and would like to play…feel free to consider yourself tagged as well! :)

2 responses so far

Oct 26 2007

The Kitchen Sink…

The Kitchen Sink is just NOT my favorite place to be. I’d much rather be playing with my kids or of course, stamping up a storm. :) But I had this opportunity to review Kitchen Sink Stamps for an article for Craft Critique. I know. That’s two articles in less than a week…I’ve been a very busy girl! LOL But….I’ve been having so much fun, so it’s all good, right? My new Kitchen Sink Stamps were fabulous to work with. Love their style! I think I’m now addicted. I’ve included one of my designs below and the rest of my article is at Craft Critique. :)

Your Kindness Touched My Heart

jks-your-kindness-thank-you-design.jpg

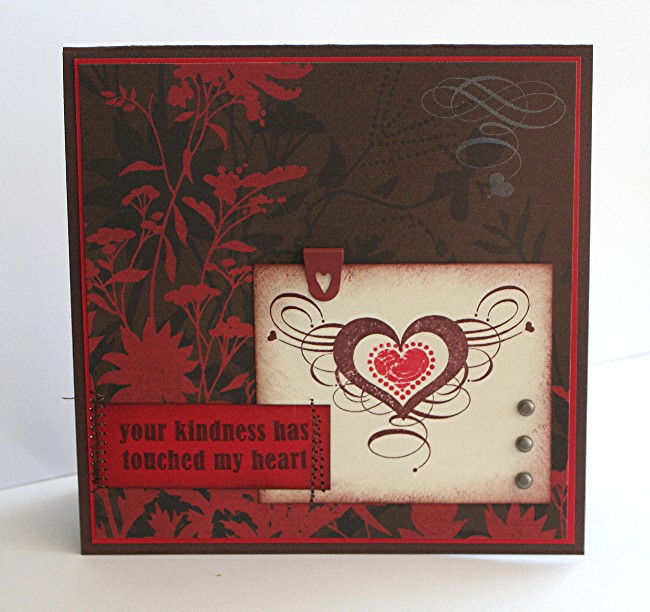
This is one of my favorite designs that I’ve created with these new kitchen Sink Stamps. Love the flourishes and swirls…this stamp is from the Thanks With Style set. I just had to try it out with a little style. :) A little different from what I usually do but oh so fun in a funky way.

When I saw this stamp, I just had to pair it up with this gorgeous Romantica line paper by Prima. It has that same great look… a little elegant, a little grunge. Pulling the color combo from the paper, I used Real Red, Chocolate Chip and Bravo Burgundy. The heart image is actually two stamps which makes it very flexible to use. I was really pleased with the clean impression these clear stamps gave with dye ink, even on the first try. A little sponging around the layers added to the dimension and style of this design.

For my embellishments, I added a small red heart clip from Making Memories. These are so darling and come in all kinds of colors and themes. Three little pewter brads anchor the main image at the bottom right. For my sentiment, I used one of the coordinating sentiments from the same set. Love that font and there are so many great thank you sayings. I stitched it down with a little brown stitching. I kept this design simple because I didn’t want to take away from the beauty of the images, both stamped and paper. Have a wonderful Friday!

10 responses so far

Oct 25 2007

Masquerade…

I thought with Halloween just around the corner, it would be fun to have a little masquerade for our Way’s to Use It Challenge You can use any type of mask you wish…positive, negative, try some blocked collage like I did, even decorate a mask for decoration or Halloween. As long as you use some type of mask…it’s all good! If you’d like to play along…check out the challenge at WT137 LOL Now I have that Masquerade song from Phantom of the Opera running through my head! I hope it doesn’t stay all day!

Joy Christmas Ornament

jks-joy-christmas-ornament-design-2.jpg


This technique just popped into my head last night before I fell asleep. I couldn’t wait to try out my new Snowflake Serenade set that arrived with yesterday’s mail. I was so busy trying to get this server connection fixed that I didn’t have time to use it. And so, I actually came up with this idea two years ago about this time. This is my new updated version with new stamps, new colors and different embellishments.

To create this design, you need a mask. I simply used a thin sheet of scrap paper and cut a circle out of it with my Coluzzle set. After laying it down on top of my white cardstock, I stamped my snowflakes with Almost Amethyst, Soft Sky and Bashful Blue. The Joy sentiment was then stamped with Purely Pomegrante. To give the ornament some depth, I sponged around the outsides of my circle mask. The closer you are the the edges, sponge it darker to make the circle look as if it is curving back.

Quick Tip: Use temporary adhesive to keep your mask in place. Post it Notes are great for small masks as well.

For the rest of my design, I decided to keep it very simple. I wanted this design fresh and crisp and the focal point to be on my stamped ornament. For the top of the ornament, I tied a little loop of silver cord and hid it behind the striped May Arts ribbon. The main card base of Soft Sky is stamped with snowflakes, tone on tone for a subtle look. My main image layer is matted with Almost Amethyst, Purely Pomegrante and more Whisper White. The top layer of Whisper White was free-style stitched with my sewing machine and to add the subtlest touch of texture, the other layer is distressed lightly with my Heidi Swapp edges distresser.

This morning is so cool here. It totally feels like winter is not so far away. I love Autumn but I love to see the first snowflakes fall too. Change is good, right!? Wishing you a fabulous day and happy masking! And oh…stop by later. I’m going to try and create a tutorial for you and tomorrow… fun designs from the kitchen sink. ;)

27 responses so far

Oct 24 2007

A Baby Shower Design…

Published by Julia Stainton under Card Designs

So frustrating isn’t it?!! When your server goes down! Yikes…another server glitch and another 18 hours without internet is not fun! A couple weeks ago it was the modem and this time the server itself. Which has kind of sent a deadline or two of mine into a bit of a tailspin. LOL Well…I wasn’t laughing last night to be sure. AND I wasted THREE hours on the phone this morning waiting for someone other than an automated computer voice to speak to me. I just couldn’t believe how hard it was to get a human being on the phone line. And so, I’m glad to be back and am busy running around regrouping and switching things around. It’s all good now though. :)

Guava Baby Shower Design

jks-baby-shower-card-2.jpg

I created this design weeks ago but for some strange reason, haven’t managed to get it uploaded yet and so, today seemed like a fabulous time. When I started this design, I decided it would be fun to take the Groovy Guava cardstock and ink and try it out for a less traditional baby design look. I really like it and isn’t it a fun change from the pink and blue? This design uses the It’s Shower Time stamp set from My Favorite Things. I love that umbrella and all the little goodies that go with it. For this design, I decided to try popping out my umbrella a little to give it some dimension. First it was stamped onto Groovy Guava cardstock and then scored and lightly bent into shape along the lines were the spines would be. Under the middle of the umbrella, I added a pop dot to keep it out and adhered the umbrella to the cardstock along the bottom curve of the design. The little scrap of white ribbon is tied and knotted and adhered with a little glue dot.

For my background, I quickly stamped baby randomly over the cardstock and then added my stamped striped panel. To stripe this panel I used the Behind the Scenes stamp set and repeatedly stamped it. It was really easy to line up the stripes with the clear polymer stamp. I’d also been wanting to try out my new ruffled May Arts ribbon and slid it around the card front and adhered it under the scalloped circle. Isn’t it pretty? I love it so much I had to go back and buy all the colors! :)

Check it out… Trudee has some fabulous goodies on her blog, Follow Your Bliss. Make sure you take the time to check it out!

Supply list:

Cardstock: Groovy Guava, whisper white - Stampin Up

Stamps: It’s Shower Time, Behind the Scenes - My Favorite Things stamps

Ink: Groovy Guava, black, Close to Cocoa - Stampin Up

Other: circle punches - EK Success, large circle and scalloped circle punches - Marvy Uchida, ribbon - May Arts, sewing machine

12 responses so far

« Prev - Next »