Daily Archives: September 5, 2007

Flourishes… a design and some news

Some exciting news from Flourishes…they have released three new stamp sets and have their September promotion now on-line! Due to a few glitches I don’t’ have any samples made yet so you’ll have to make sure you take a peek on their web-site! I can’t wait to get designing with them! This month’s special will help you get a head start on your holiday card designs. Super idea! I always leave it to the last minute! Not a good plan for sure! There are two new holiday releases and one floral set! Keep checking back…I’ll have some samples in the next couple days. 🙂

I did create this simple baby card design last week using the Flourished Words stamp set. I just love the elegance of the script font of this set. So beautiful and so easy to use!

Make sure you scroll down…this is my second post of the day. This morning we had another Take Two challenge…you should check out the other designs! The girls’ cards are stunning! 🙂

Baby Best Wishes

jks-flourishes-baby-best-wishes.jpg

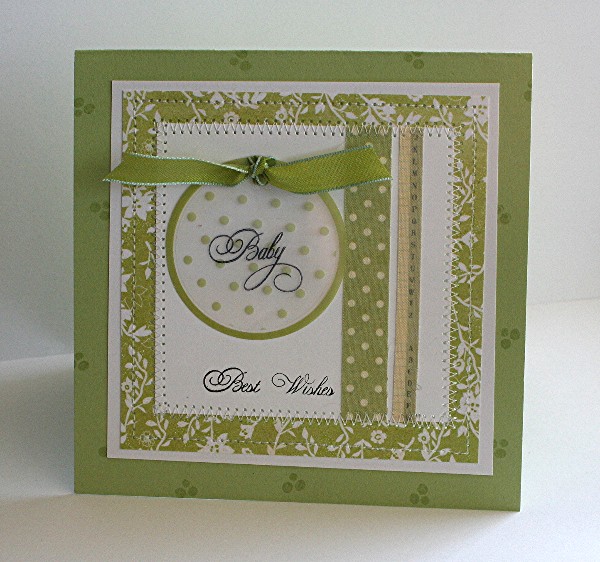
For this design, I was inspired by this darling Making Memories clear transparencies package I bought at Michael’s last week. Sooo pretty! They just make me want to design baby cards and layouts! Actually I purchased them because some of the tags etc. would work for other designs as well. For this card, I built the color combo and design around the transparency tag. The baby sentiment was stamped directly onto it with Black Stazon.

Quick Tip: When stamping on transparencies, use Stazon ink and careful stamp your image. A straight up and down motion will help prevent smearing. Press firmly but not too hard, your stamp may slide on the slick surface.

I love a monochromatic look and seeing as I also had lots of celery goodies, I decided to go with a white and celery design. The Lily Kate paper worked perfectly for this and I layered it on top of my celery card base after matting with white. A white center panel, keeps the design clean and makes the transparency tag easy to read. another fun Making Memories purchase is my Vintage Hip Textured Tape. I love this tape! So fun and easy to use…it is like a ribbon that is self adhesive. I applied two strips of it and then zig zagged my edges…you know how I love to add a touch of stitching!

The tag was then tied with a May Arts ribbon and adhered with a glue dot under the ribbon. The Best Wishes sentiment was the final touch. I simply stamped it onto the white layer and my design was done! No images on this design but I think it is kind of cute the way it is. What do you think?

And something I thought I’d share…for those of you who like card sketches…here is the sketch for this layout…

jks-card-sketch-baby-design.png

Supply List:

Cardstock: Whisper White, Certainly Celery – SU

Patterned Paper: Lily Kate – Basic Grey

Stamps: Flourished Words, Cake Decorating 101 (dots on card base) – Flourishes

Ink: certainly celery, Black Stazon – SU

Other: Sewing machine, ribbon – May Arts, transparency tag & Vintage Hip textured tape- Making Memories, glue dot – SU

Take Two… Websters and Inkadinkado!

Another Take Two challenge today! A Take Two challenge is a little fun challenge myself and three of my friends take every few weeks. We pair up a Stamp set or line and a paper line and see what we can come up with. I love seeing the difference in the styles with the same/similar product. Today’s we’ve paired up some great Inkadinado stamps (fairly new to me but I’ve just totally fallen in love with them) and the new Websters Pages. Oh wait! LOL It is new to me too and it is gorgeous! I think I’m now hooked on both!

Look below for my design and make sure you check out the other designs as well. Lindsey, Michele and Trudee never disappoint. As I write this, I haven’t seen their designs either, I just can’t wait! 🙂

Sailing Birthday Design

jks-sailing-birthday.jpg

I’ve been looking for some great sailing stamps for a very long time! I just love this new sketches line by Inkadinkado! Gorgeous and so easy to color and use! I just had to make this card for my son’s birthday…actually it is not until December but you know how busy that month can be!

The main image was so quick to do. I used my Prismacolor colored pencils and quickly colored it in. Because of the sketchy nature of the image, you really don’t need any Gamsol to blend. Over top of the image, I stamped my sketched shell three times without reinking in Close to Cocoa ink. To add a little shading to the shells, I lightly shaded them with a light grey colored pencil.

The patterned paper is by Webster’s Pages. I used Picnic and Shortbread….don’t you just love the names?! My son loves blue so I pulled out a little Bashful blue…the color is in one of the stripes and the water of course, and matted the layers with it. Card base is 5.25″ square of Very Vanilla.

For my embellishments, I decided to use some bold hardware. The buckle is from the SU Hodgepodge Hardware set. Can you believe I’ve never used one of these before. I’ve been sorely neglecting them and as I’m really getting down in my remaining selectionm I thought it was time to start using them! The buckle is held with strips of chocolate Chip cardstock to “hold” it all together. The huge brad is one of my recent favorites. I just LOVE the big bold look of this Karen Foster Designs Really Big Brad. Actually…I’m looking for a source for more. If you know of one that ships to Canada without huge fees…I’d be VERY intersted! 🙂 A little distressing, a Happy Birthday sentiment and a little paper piercing finishes it off.

Hope you enjoyed our challenge!

Supply List:

Cardstock: Bashful Blue, Very Vanilla, Chocolate Chip – Stampin Up

Patterned paper: Picnic, Shortbread – WEbster’s Pages

Stamps: Shell and Sailboat – Inkadinkado, It’s Your Birthday – SU

Ink: Basic Black, Close to cocoa – SU

Other: buckle (Hodgepodge Hardware) , Mat Pack- SU, Really Big Brad – Karen Foster Designs, colored pencils – Prismacolor