Monthly Archives: July 2007

A Dare to Get Dirty Sketch Challenge!

I am so excited to be able to host today’s sketch challenge for SCS Dare to Get Dirty celebration! I love sketch challenges! They are one of my favorite kind of challenges and one of the very first I started doing! So many different ideas and variations and I love to see how they all turn out.

Today I’m asking you to play along with me! This sketch is a variation on one of my very card designs that I created last December. I’ve been wanting to give the sketch another whirl but always seem to forget! This seemed like the perfect opportunity to give myself a kick in the butt and just do it! I hope you’ll join me in the Dare to Get Dirty Friday Forum and play along! To check out all the fabulous samples and submissions of this sketch design….visit HERE! πŸ™‚ I can’t wait to see what you come up with! I hope you enjoy it!

Jolies Friend

jks-jolies-friend.jpg

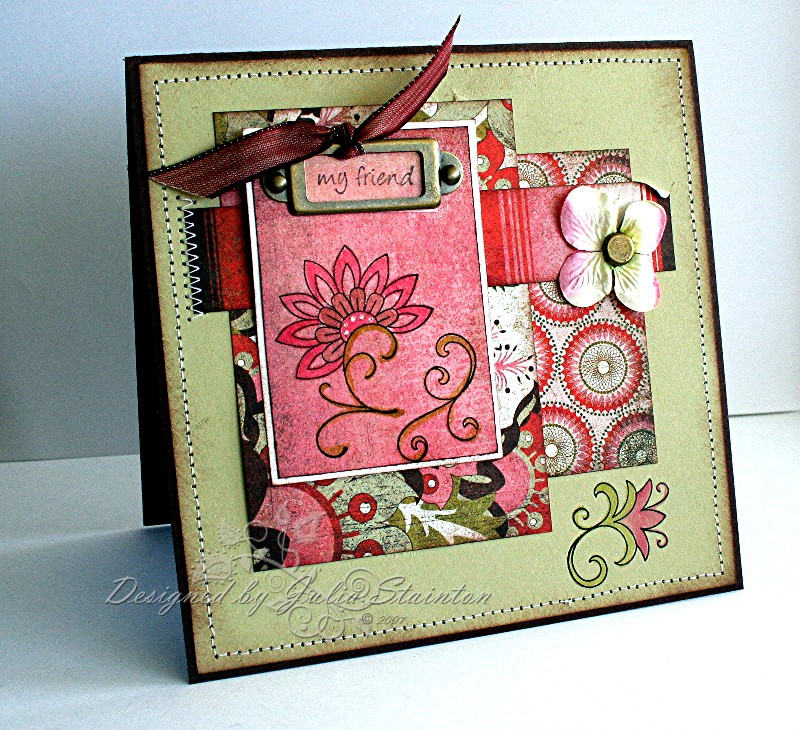
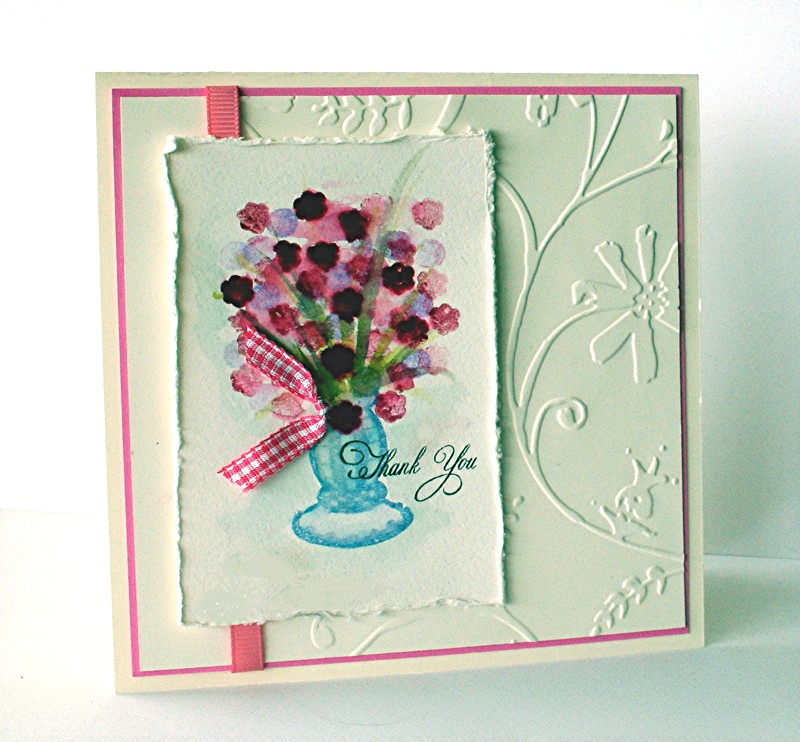
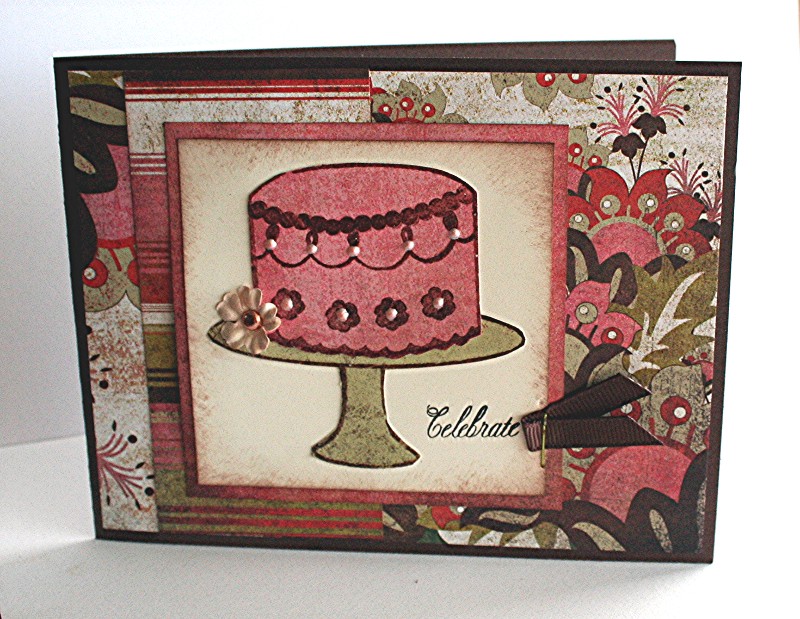
For this card design, I wanted to use my new Infuse 6×6 patterned paper by Basic Grey! Love it! I decided it would look really great with my Jolies Fleurs stamps by Lizzie Anne Designs. I stamped my stylized flower onto the patterned paper and carefully watercolored it.

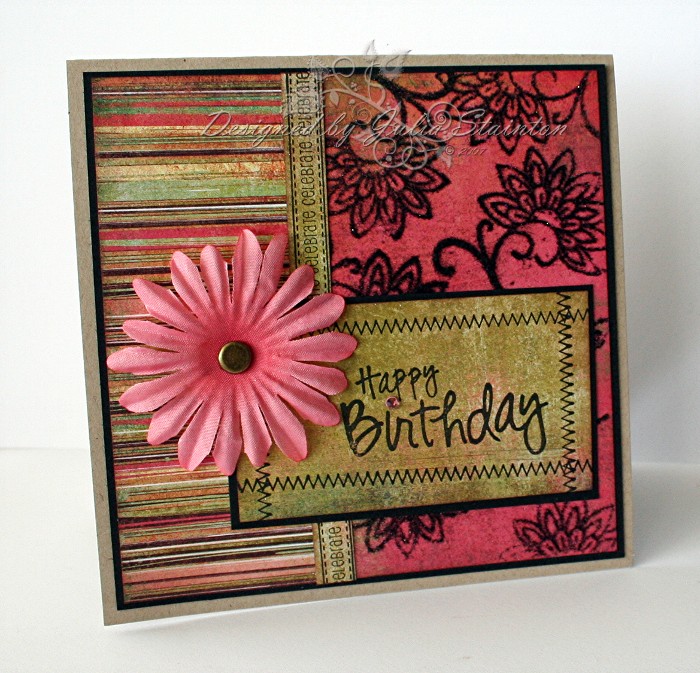
Now don’t laugh! I forget half of what I was going to say about this design! LOL I made it weeks ago so that the sample makers could create their’s as well! Sooooo…basically, what you see is what you get. A “scrapbook style” design of layered patterned paper with stamped images as the feature highlights. πŸ™‚

All the edges were sponged with Close to Cocoa ink and I added lots of stitched elements to add interest. I think basically this card is all about my favorites. Favorite papers, techniques, favorite Cherry Blossom Prima … you get hte picture. πŸ™‚ The little piece of Hodgepodge Hardware at the top has a little piece of acetate in it stamped with my friend. A May Arts ribbon tied to the top of the hardware, finishes it off.

And soooooo….enough about this design! Time to stop reading, get off the computer and start stamping! Have fun! And make sure you get lots of sleep! There are DOUBLE the amount of challenges tomorrow! πŸ˜‰

Supply List:

Cardstock: Chocolate Chip, River Rock – Stampin Up

Patterned Paper: Infuse 6×6 paper pad – Basic Grey

Stamps: Jolies Fleurs, Simply Sentiments – Lizzie Anne Designs

Ink: Black Palette Noir – Stewart Superior, Rose Red, Old Olive, Close to Cocoa – Stampin UP

Other: Hodge Podge Hardware, Aquapainter – SU, ribbon – May Arts, sewing machine, Cherry Blossom flower – Prima, thumbtack brad – Karen Foster Design

A Lizzie Anne Birthday…

This card is a belated birthday card design for Meridith…one of the owners/designers of Lizzie Anne Designs. Happy Birthday Meridith! Sorry this is late! Of course, I just had to use my favorite Jolies Fleurs set for this design and a few other of my favorite stamps too!

I also decided to have a little fun and play along with two of today’s Dare to Get Dirty Fan Club Challenges. πŸ™‚ The sketch challenge and the Flocking Challenge…seemed like a perfect combo for this card design. I always love challenges…they give you a fabulous jumping off point and it always fun making them work. πŸ™‚

Flocked Jolies Fleurs

jks-flocked-fleurs.jpg

For this design, I decided to have a little fun with patterned paper. One of my favorite things is to stamp on patterned paper as I love the underlying texture it gives. Following the sketch layout, I added striped paper on the left side panel and then rose distressed paper on the right. These papers are well as the “ribbon” and centre panel are all from the Stella Ruby 6×6 paper pack from Basic Grey. I just love the rich colors and designs!

To flock the rose paper, I first stamped over the design with my flower stamp and Versamark ink. I then sprinkled the whole thing with Stamp and Bond embossing powder from Stampendous and lightly heated it with my heat gun. Working quickly, I sprinkled the whole thing with my black flocking and then shook off the excess. I love my Essential Glue pad but find that the Heat and Stick powder works the best for flocking.

Quick Tip: If you want your stamped “ribbon” to work for a larger area than the length of the stamp, use two pieces and hide the seam under a layer.

The background layers were adhered to a black mat and then to my 5.25″ square card base. To create the “ribbon” I used my Shapes and Stitches set and stamped again on patterned paper. For the sentiment layer, I used the same set to stamp on faux zig zags around the panel and then stamped the sentiment in the box. To finish off the design layout, I added a Heidi Swapp pink flower with a Karen Foster Designs thumbtack brad in the center.

Supply List:

Cardstock: Kraft, black – Stampin Up

Patterned Paper: Stella Ruby 6×6 paper pad – Basic Grey

Stamps: Jolies Fleurs, Shapes and Stitches, Happy Birthday (Simply Singles) – Lizzie Anne Designs

Ink: Versamark – Tsukineko, Close to Cocoa – Stampin Up, Palette Noir – Stewart Superior

Other: brad – Karen Foster Designs, Flower – Heidi Swapp, rhinestone – A Muse, Flocking & Heat & Bond Powder – Stampendous

Watercolor Blooms…

I told you I’d share my favorite Flourishes design and this is it! I had so much fun getting a little creative with the set. You’ll have to look close…see the vase? It is the fancy pedestal for the cake plate! The flowers are tiny flowers for embellishing the cake! I was just tickled with this one. πŸ™‚

Now if you are checking in today, Thursday, you are probably wondering about the Ways to Use it Challenge! Because I’m so swamped at the moment… Shelly (papermoon04) is so kindly helping me out! Make sure you check out the super fun WT123 Product Parade on SCS and play along if you can! Thanks so much Shelly! I hope that those of you who are SCS Fan Club members are having a fabulous time on the second day of Dare to Get Dirty! πŸ™‚ Actually…LOL….you are all probably so busy that you don’t have time to blog surf! Have fun creating!

Two things you may want to take note of for tomorrow! First of all…Flourishes is having their Grand Opening! So exciting! Be sure to check it out! The second thing…Friday is my day to post a challenge in the Dare to Get Dirty challenges. Stop by and play along! It is sure to be a lot of fun!
Flourishes Vase
jks-flourishes-watercolor-vase.jpg

For this design, I had to try a few things to get it to work. I’ll share them here and then you can do it on the first try. πŸ™‚ USE watercolor paper! It makes a huge difference!!! First of all I stamped my vase with Brocade Blue classic ink. I then watercolored in some strokes of greenery with my Aquapainter and Old Olive ink. With one of the tiny flowers, I repeatedly stamped first and second impressions of flowers in Lavendar Lace to get good coverage and then repeated with another flower stamp and Purely Pomegranate. I then added in more greenery strokes with Always Artichoke. Really…this didn’t take long…it just sounds like more work than it is! With a wet aquabrush or a spray bottle with fine mist of water…lightly wet the flowers so they blend like a watercolor. Go back and lightly brush the edges of the vase to pick up the blue color and lightly color in the vase.

Quick Tip: If you find your paper too wet or your colors are bleeding….quickly blot with a tissue.

After allowing the paper to dry well, I then stamped the sentiment over the vase and adhered a little scrap of knotted ribbon with a glue dot. I decided I didn’t want to mat my image to keep the design subtle and play up on texture rather than harsh contrasts. To do this and still define my edges, I used my edge distresser to add texture.

To keep the focus on my “watercoloring”, I decided to keep the background very subtle and simple. I decided to emboss my vanilla cardstock with the Cuttlebug Stylized Flowers folder. This one is my fave! Now these folders do have there limitations. When making a square card, it has to be a pretty small layer or you can’t emboss the whole surface. What to do? Make it part of the design! And so, I embossed just over 3/4 of the surface by inserting as much of the square as possible into the folder and then embossing. I then ran a rose ribbon over the “seam” to incorporate it into the design and to anchor my main image. πŸ™‚ Easy! The panel was then matted with an 1/8″ layer of regal rose and then mounted onto a 5″ square vanilla card base. C’est tout!

Supply List:

Cardstock: Very Vanilla, Regal Rose – Stampin Up

Stamps: Flourished Words, Cake Decorating 101 – Flourishes

Ink: Purely Pomegranate, Lavendar Lace, Old Olive, Brocade Blue, Always Artichoke – SU, Black Palette Noir – Stewart Superiour

Other: Cuttlebug & CB embossing folder – Provocraft, aquapainter & Ribbon- Stampin Up, Edge Distresser – Heidi Swapp, gingham ribbon – Wal-mart

Have You Checked Out….

  • Craft Critique? Holy cow! The Craft Critique reporters (those who were lucky enough to go! sniff, sniff) have been putting together some awesome reports on CHA! A ton of fun and a ton of new products! Can’t wait to see them in stores soon!
  • Dare to Get Dirty Challenges? Just a quick reminder that Splitcoaststampers is having their third anniversary and the excitement is now well underway! It is not too late to sign up for a Fan Club membership if you’d like to support the site and join in the fun!

Believe….

The latest edition of Papercraft’s Card Creations comes with mixed feelings for me. So excited to have two designs, published in it, my first “large” special edition Papercrafts publication and so VERY excited to have one of my designs inspire the Editor’s Pick at the beginning! Which also brings me right back to my very mixed feelings. The card Believe was inspired by my mom.

Many of you know that my mom passed away five weeks ago. I had hoped that she would live to see it in print but that was not to be. Her decline was so rapid the last few weeks, I would not have wished it for her. Mom did see it before I mailed it in to the editor and she thought it was beautiful. She was so great at supporting me and sharing in my joy when I managed to get a design accepted. I miss that. I miss talking to her every morning. I miss her joy. I miss her care. I was thinking of giving this card away but now I know that I’ll be keeping it close.

Believe Card

jks-believe-blog-pic.jpg

As I mentioned above, this card was designed for my mom last January. I thought it would be a beautiful card for a cancer patient, especially one who was terminally ill. It is so hard to find the words to say the right thing. Get well soon is just not appropriate. The inside sentiment was to be… Believe, in a better tomorrow. Appropriate for anyone going through hard times. My mom is now in her “better tomorrow”. She believed. And I do too.

I also thought this design would work well for a graduation or for someone starting a new phase in their life. So simple, so fresh…full of new possibilities. In that instance, what about the sentiment, Believe…. the future belongs to those who believe in the beauty of their dreams.

My Mom

nany-and-little-boys-small.jpg

I came across this beautiful picture of my mom with my two youngest boys. It was taken two years ago, in the hospital just after the birth of Joshua. She had been diagnosed with Melanoma the week before. I thought I’d share it with you here. I must admit, it has me crying yet again. Joshua just saw it & was for calling for Nana. I cherish each wonderful memory I have of her. While writing this has been very hard, in a way, it is also very good. A song by Jeremy Camp came to mind while writing this and I’ll end by sharing it with you…

Scattered words and empty thoughts
Seem to pour from my heart
I’ve never felt so torn before
Seems I don’t know where to start
But its now that I feel your grace fall like rain
From every fingertip washing away my pain

I still believe in your faithfulness
I still believe in your truth
I still believe in your holy word
Even when I don’t see, I still believe

I believe I’ll be seeing Mom again. I believe.

If you’d like to purchase Card Creations 5, you can order direct from the Papercrafts site HERE. I can’t wait to get my copy! The joys of living in Canada…lol, you get delivery after everyone eles. BTW, if you do, my other design is called Black & White Congrats and I hear you can find it in the Congratulations section. πŸ™‚

Supply List: whisper white cardstock – Stampin Up, patterned paper – Sassafras Lass, crystal brad – Making Memories ,sentiment rub-ons – Royal & Langnickel, sewing machine

Shabby Princess {C’est Bon}

As promised….I finally got my {C’est Bon} article finished!!! πŸ™‚

This week for my {C’est Bon} entry I thought I’d share something I’ve been having a little fun with lately! I’ve been having such a great time playing around with digital scrapbooking. πŸ™‚ Now, I’m definitely NOT an expert and these pages are just beginner but maybe it is something you may want to give a try!

I was first introduced to Shabby Princess on Beth’s Freckled Fun Blog. How cool I thought and of course, I just had to give it a try! It was a little frustrating I must admit while I learned a few basics, but oh so fun. The great thing about Shabby Princess is their free digital downloads! They are PERFECT for a beginner wanting to give it a try…no supply investment…just download and have some fun! If you do get addicted…LOTS more VERY cool digital kits available at their Shabby Shoppe. πŸ™‚

Things I like about Shabby Princess…

  • free digital downloads
  • love the shabby style
  • fun
  • need help? Tutorials on site
  • digital elements all work well from one kit to the next…combine them! πŸ™‚
  • you never run out of paper or embellies!
  • Digital kits store on your computer…no more mess
  • want more? Lots of new kits released for purchase
  • there are even great digital goodies to designed for blog use!
  • you don’t need to run out to the store!
  • print out some of the paper or elements with a photo and use it for hybrid design
  • template available for designing photo cards
  • great newletter…make sure you sign up for it!
  • gallery on-site for inspiration
  • chat room

A few of my samples… go easy on me πŸ™‚ It takes a bit of practice!

(Click on pics to enlarge to see detail)

jks-digo-page-joy-2-me-resized.jpg

Joshua at the beach – uses Express Yourself Free Kit by Ronna Penner

heather.jpg

Flowers are Beautiful – uses Shabby Mommy Free Digital Kit

jks-joshua-joy-resized-for-blog.jpg

Joy – uses Sun Porch Free Digital Kit by Amy Teets

Sooooooo…… does this mean I’ll be forsaking papercrafting?! Definitely not! But there is always room for new ideas, new projects, new designs…and this digi stuff is super fun! I just know you’ll be seeing more of it popping up in the future as the mood strikes!

Please note: I am not in any way affiliated with Shabby Princess. πŸ™‚ Just a happy newbie digi scrapper.

Let’s Eat Cake!

Yay! Flourishes has unveiled their brand new soon to-be-released stamp sets, Cake Decorating 101 & Flourished Words! I’ve been having a great time playing with my new sets that arrived last Friday! You should really check them out as the sets are now viewable at Flourishes. The grand opening for Flourishes is Friday July 27 and there will be a promotion running from July 27th to August 1st to kick it off! 15% off the stamp/paper combo Fourished Infusion Combo kit. So fun!

The new, exclusive Cake Decorating 101 set is so darling! I just love all the options you have! Thirty-Four!!! mix and match pieces to create your own cake design. Cake decorating has never been so much fun, especially since there is no kitchen to clean up afterwards! I took a course in cake decorating about 7 years ago (I know,I know… I have to try everything at least once! LOL) and believe me, the mess I would make was incredible! LOL

The other new, exclusive stamp set is Flourished Words! Love them! Gorgeous script, fabulous size and great variety of sentiments. I just love how easy it is to stamp them and the stamps are clear photopolymer. I know these 27 words that mix and match and fit into a cute little CD case are going to be long-time faves!

Paper-Pieced Cake

jks-flourishes-paper-pieced-cake.jpg


For this design, I just had to try paper-piecing the cake. It is hard to see in the pic, but using the Basic Grey pink and sand colored distressed patterned paper works perfectly to give the cake some texture and a fun look. Using a Colorbox cat’s eye craft pad in dark brown, I inked up my cake pieces, stamped the cake and then embossed it all in clear embossing powder. After cutting out the cake, I did the same with the pedestal platter. Cutting it out means, easy, easy, easy. I didn’t even have to mask the cake to add the plate. AFter gluing the cake all together onto Very Vanilla cardstock, I added a tiny Prima flower and brad and then used soft pink liquid pearls to add some more frosting. πŸ™‚

The layout itself is pretty straightforward. This Infuse paper is sooo pretty, you just don’t want to cover too much of it up! All the cardstock and patterned paper edges were sponged with Close to Cocoa ink. A little scrap of ribbon was stapled on the main image to draw attention to the sentiment and add to that shabby look.

I’ve been busy designing lots of new cards and ideas for this stamp set. Make sure you come back Friday for my favorite! It’s a little out of the box and you may not even see right away that I did use the set. I can’t believe how flexible this Cake Decorating 101 set is. You can do more with it than just decorate cakes! πŸ™‚

Supply List:

Cardstock: Chocolate Chip, Very Vanilla – SU

Patterned paper: 6×6 Infuse paper pad

Stamps: Cake Decorating 101, Flourished Words – Flourishes

Ink: Close to Cocoa – SU, Brown Craft – Colorbox

Other: ribbon – SU, stapler, Prima, brad – Making Memories, liquid pearls – Ranger