
Well, the challenge itself isn’t getting me distressed…I love it! The challenge IS to USE distressing techniques. 🙂 When I saw that Michele was doing a distressing challenge for one of today’s DTGD challenges, I just had to make a card. I LOVE distressing! Now for this design, I kept it pretty light on the distressing. I didn’t want it to overwhelm of the vintage baby look…but it is there! Distressed edges and lots of light sponging. 🙂 If you want to play along, check out today’s challenges here!
Vintage Baby Girl
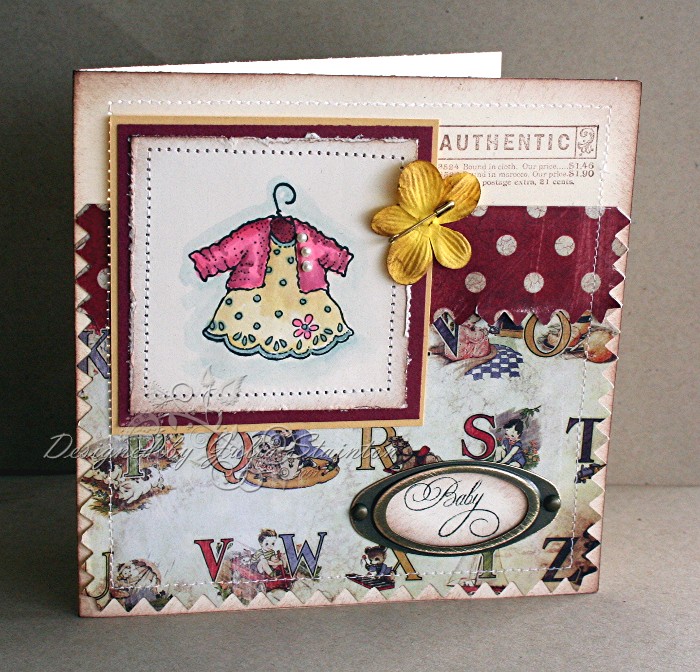
I was so excited to get this Stampendous stamp last Friday from Anna Wight. (Actually I just checked her store and she is all out but if you e-mail her, she will order it in.) I just LOVE it! I’m hoping that lots of people will be having lots of little girls so that I can keep using it. It is soooo sweet! I couldn’t wait to pair it up with this darling Daisy d’s swatch paper. i just love the pre-pinked edges and designed the card to play up on this feature.
To make the main part of this design, I used 5.5 ” square card base of Very Vanilla and sponged the edges with Close to Cocoa ink. I folded over the top 1/4 of the paper to show the reverse side and break up the design without cutting off the very cute pinked top edge. The edges were then stitched around with my sewing machine and I lightly distressed the pinked edge by running my finger along to pull up some of the edge. I then stamped Authentic from my SU Stamp of Authenticity Set at the top right corner.
For the main image, I stamped it on a scrap of Very Vanilla cardstock and watercolored the dress with my aquapainter and ink in the lids of my inkpads. To get depth while watercoloring, I usually start with a light color wash of the area and then add in darker details after that has dried a little but not all the way so it will still blend in a little. My favorite part of the dress is the little pearl buttons. I just love these little pearl stickers from Ellen Hutson! After sponging and distressing the edges of the image panel, I matted it with So Saffron and a piece of the Swatch Daisy D paper. I then added more stitching for definition and to add to the vintage look. If you like the look of stitching but are unsure of how to do it, check out my Sewing Tutorial that I wrote a few months ago for tips. 🙂
For the sentiment, I used my new Flourished Words stamp set. I just love these sentiments! I punched it out with my SU oval punch and then framed with with some Hodgepodge Hardware that had been distressed by sanding the metal finish. My final touch was a sponged yellow Prima flower, I believe from the Baby Girl Collection, which I pinned with a safety pin and then adhered to the design.
I love this card. I’m keeping it in a very safe place as my husband’s brother and wife have a special little bundle on the way. If it is a girl, she’ll be getting this card. 🙂
Supply List:
Cardstock: So Saffron, Very Vanilla – SU
Patterned Paper: Daisy D’s
Stamps: Baby Dress – Stampendous, Flourished Words – Flourishes,
15 responses to “A Distressing Challenge”