
Thursday again and time for another Way’s To Use it Challenge. !Today’s Ways to Use it Challenge is to use your stylus. A stylus is a like a writing instrument with a rounded metal end. It is used for dry embossing and it can also be used with paint to make uniform dots. I know this may be a bit of a challenge but you know, there are only so many products out there! LOL I’m running out of ideas! If you have any, please let me know and I’ll put them on the short-list. 🙂 If you’d like to play along, everyone is VERY welcome! Check it out at WT121
Text Boxed Vellum
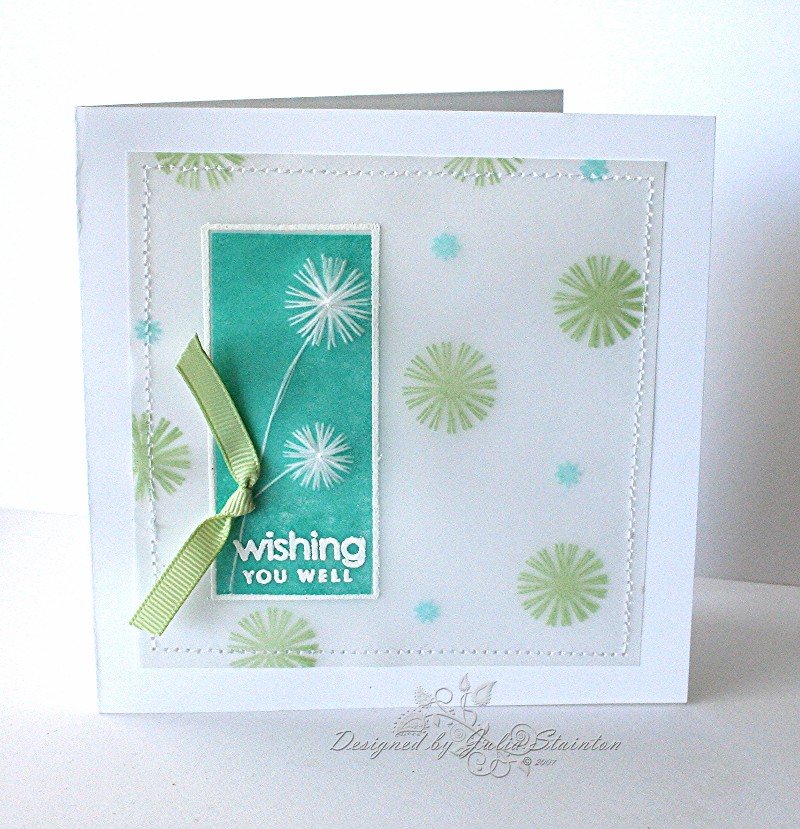
Lately, I’ve just been loving vellum! So soft and pretty! For this design, I was inspired by shadow embroidery. I used to do this type of embroidery on the bottom of smocked baby dresses…so beautiful with the color softly coming throught the semi-sheer fabric. To get this look, I stamped on the reverse side of the vellum with my Versamagic chalk inks. I bought this set of four at Michael’s and I just love this combo. I used three of the pads…. Sea Breeze (you’ve seen a lot of this one lately), Turquoise Gem and Aloe Vera. I love my Text Boxed Papertrey Ink stamp set! I’m sure that you can tell, it has been popping up regularily and I have a few more designs to come over the next week. 🙂
After flipping my vellum back to the right side, I inked up my my rectangle box stamp with Versamark and stamped directly over my text box flowers. The joys of clear stamps for sure! I also stamped on a little sentiment from Faux Ribbon and then embossed them both with white embossing powder.
I then flipped my vellum back to the reverse side…stay with me here, we’re almost done. 🙂 I laid my vellum onto my firm foam pad that comes with the Stampin Up mat pack…you can use a mouse pad if you wish as well. I then took my stylus and carefully embossed the flower and stems by slowly rubbing the vellum with my stylus. I just love how embossing turns the vellum to a more “vivid” opaque white and raises up the surface for definition. It is really hard to get the full effect in the photo but it looks stunning in person. So simple too!
Quick Tip: If you don’t have a stylus, an old ball-point pen or gel pen that is dried up can also work. You will want to make sure that it is REALLY not working at all though, before trying this out on your design.
To put it all together, I put my vellum square onto my Whisper White 5″ square card base and stitched the edges on my sewing machine. I love the subtle way it holds it together without brads. I was going for a very serene look for my card design. For this card, I decided that less would be more and kept the embellishments to a minimum. A little scrap of ribbon tied into a knot was all that was needed. I used a SU glue dot to adhere it…a fabulous way to firmly add embellishments.
You may also want to check out Craft Critique today. I have an article on Altering Ribbon this morning. Also check out yesterday’s Ribbon Carnvial while you are there. Lots of great links to ribbon ideas on all sorts of crafting blogs. Have a fabulous day!
Supply list:
Cardstock: Whisper White, Vellum – Stampin Up
Stamps: Text Boxed, Faux Ribbon – Papertry Ink
Ink: Versamagic Turquoise Gem, Aloe Vera, Sea Breeze & Versamark – Tsukineko
Other: ribbon & glue dot- Stampin Up, sewing machine, stylus